

Music Production


Joël Dollié is a Mixing and Mastering engineer who had his talents utilized by artists like Gryffin or Cubeatz, or companies like the SPM Music Group, Ubisoft or Riot Games.
Mixing orchestral music is a different job from mixing a pop song or an EDM track. The instruments were recorded in a real room by microphones at real distances, and much of the "mix" you hear in a good sample library was made by the engineers who recorded it. That changes what you should do with your faders and plugins, and, just as important, what you should leave alone.
This guide walks through the eight-step workflow our instructors teach, from orchestration check to mono check. It applies to sample-based mock-ups and live recordings and points out where the two differ. Where a number appears, treat it as a starting point for the situation described, not as a rule.
The recording already contains a mix. Most orchestral libraries are recorded in situ: first violins left, celli right, horns left of center, trumpets right. Room, seating, and distance are baked into the samples of the virtual instruments you load, and the default mic mix was built to blend. Much of your work is enhancing that recording rather than replacing it.
Ensembles average themselves out. Twelve violinists don't produce the note-to-note spikes a single vocalist does, and distance blurs the dynamics further. That's why full-range compression, the default tool in many other genres, is used sparingly on orchestral sections.
Depth matters as much as width. In an orchestral or cinematic mix, the front-to-back axis sells the illusion of a real ensemble: strings forward, brass a little farther back, percussion behind. One of our instructors borrows David Gibson's picture from The Art of Mixing: the mix as a three-dimensional space, with panning as the X axis, frequency as the Y axis, and depth as the Z axis.
One consequence runs through the whole guide: a good recording means less processing. Most of orchestral mixing is balancing and EQ; the rest is spatial work.
Two habits run through all eight. Do a fast first pass before you refine anything, because, as Joël Dollié puts it in our Mixing Cinematic Music course, "it doesn't matter how one sound sounds by itself, but it matters how it sounds in context." And automate early: a balance that is right in the intro will be wrong in the climax.
Before you touch a plugin, listen to the arrangement as a whole. Joël, who has reviewed hundreds of mixes, is blunt: mixing can compensate for weak orchestration to a degree, but "it doesn't beat good orchestration."
Ask three questions: Is the bass line there? Is the harmony complete? Are the leads clear and balanced against the rest? If a climax feels thin, check arrangement, performance (are the dynamics actually played?), and balance before reaching for an EQ boost. Often the fix is a doubling or a missing low voice, not a frequency.
Then balance in stages: within a section first (all strings, all brass, all winds, all percussion), then the sections against each other. Not everything needs to be heard clearly; melody, bass, and harmony must be strong, and a tremolo bed belongs behind them. In Joël's words: "Sometimes too much clarity is actually bad, because the right balance might actually not be the clearest balance."
The orchestral templates our instructors build share one shape: instrument or mic position → library or section bus → orchestral bus → pre-master → stereo out. The pre-master is one fader for balancing the music against dialogue and effects. Synths, sound design, and other non-orchestral elements bypass the orchestral bus and join the signal path at the pre-master, so the orchestral bus processing only ever touches the orchestra. The stereo out carries meters and, at most, a safety limiter.
Group what gets the same treatment: one strings bus if all strings come from one library, one bus per library if you layer two, because each will want a different reverb send. Route reverb returns into the same orchestral bus as their sources and verify by muting the pre-master: anything you still hear is misrouted.
Think about delivery before you build. If a client may ask for stems (section bounces such as strings, brass, winds, percussion, each with its share of the reverb), one shared hall makes independent wet stems harder: you then print the reverb as a separate effects stem or split the returns per section. Individual track exports remain possible either way; grouped, reverb-inclusive stems are what depend on early routing decisions.
Gain staging means sensible levels at every point in the chain, and the important word is before. Digital summing doesn't care whether a stem peaks at −3 or −10 dBFS, but plugins can: an analog-style EQ or compressor fed a stem peaking near 0 dBFS may overdrive its modeled circuit, and in a very quiet track the noise floor of a plugin that models one becomes more prominent relative to the signal.
Because track faders usually sit after the inserts, lowering a fader doesn't fix an overloaded plugin input. Lower the level where it enters the chain: clip gain, the channel's input trim, or a gain plugin as the first insert. Joël's habit with delivered stems is to lower all of them together by the same amount, so the composer's balance survives. A trim on the master only prevents clipping at the sum; it can't undo distortion that happened earlier.
Most libraries and most live sessions give you several microphone perspectives:
Start with the main position and add from there. Joël begins with the close mics off and turns them on only where needed, because they bring harshness and artifacts along with their detail. The library's default mic mix is usually a good starting point.
Width comes from mic spacing: three close mics over the first violins, all panned to the same spot, are effectively mono; the tree is wider because its left and right mics receive the sound at slightly different times; the outriggers are wider still. A loud center mic narrows the image; pulling it down a few decibels opens it up, but keep enough center to avoid a hole.
Live recordings have less freedom. The tree and the stereo pairs can be positioned, but moving them moves the entire recorded image, not one section. You can nudge left and right levels by a decibel, add a little spot mic, or layer samples under a weak section. Spill between the mics limits all of this, but it is also part of what makes a live session sound like one event. Sampled sections were recorded separately, so that spill between sections doesn't exist; their coherence comes from the shared hall, matching mic perspectives, and the seating captured in each library, and from how carefully you combine libraries that weren't recorded together.
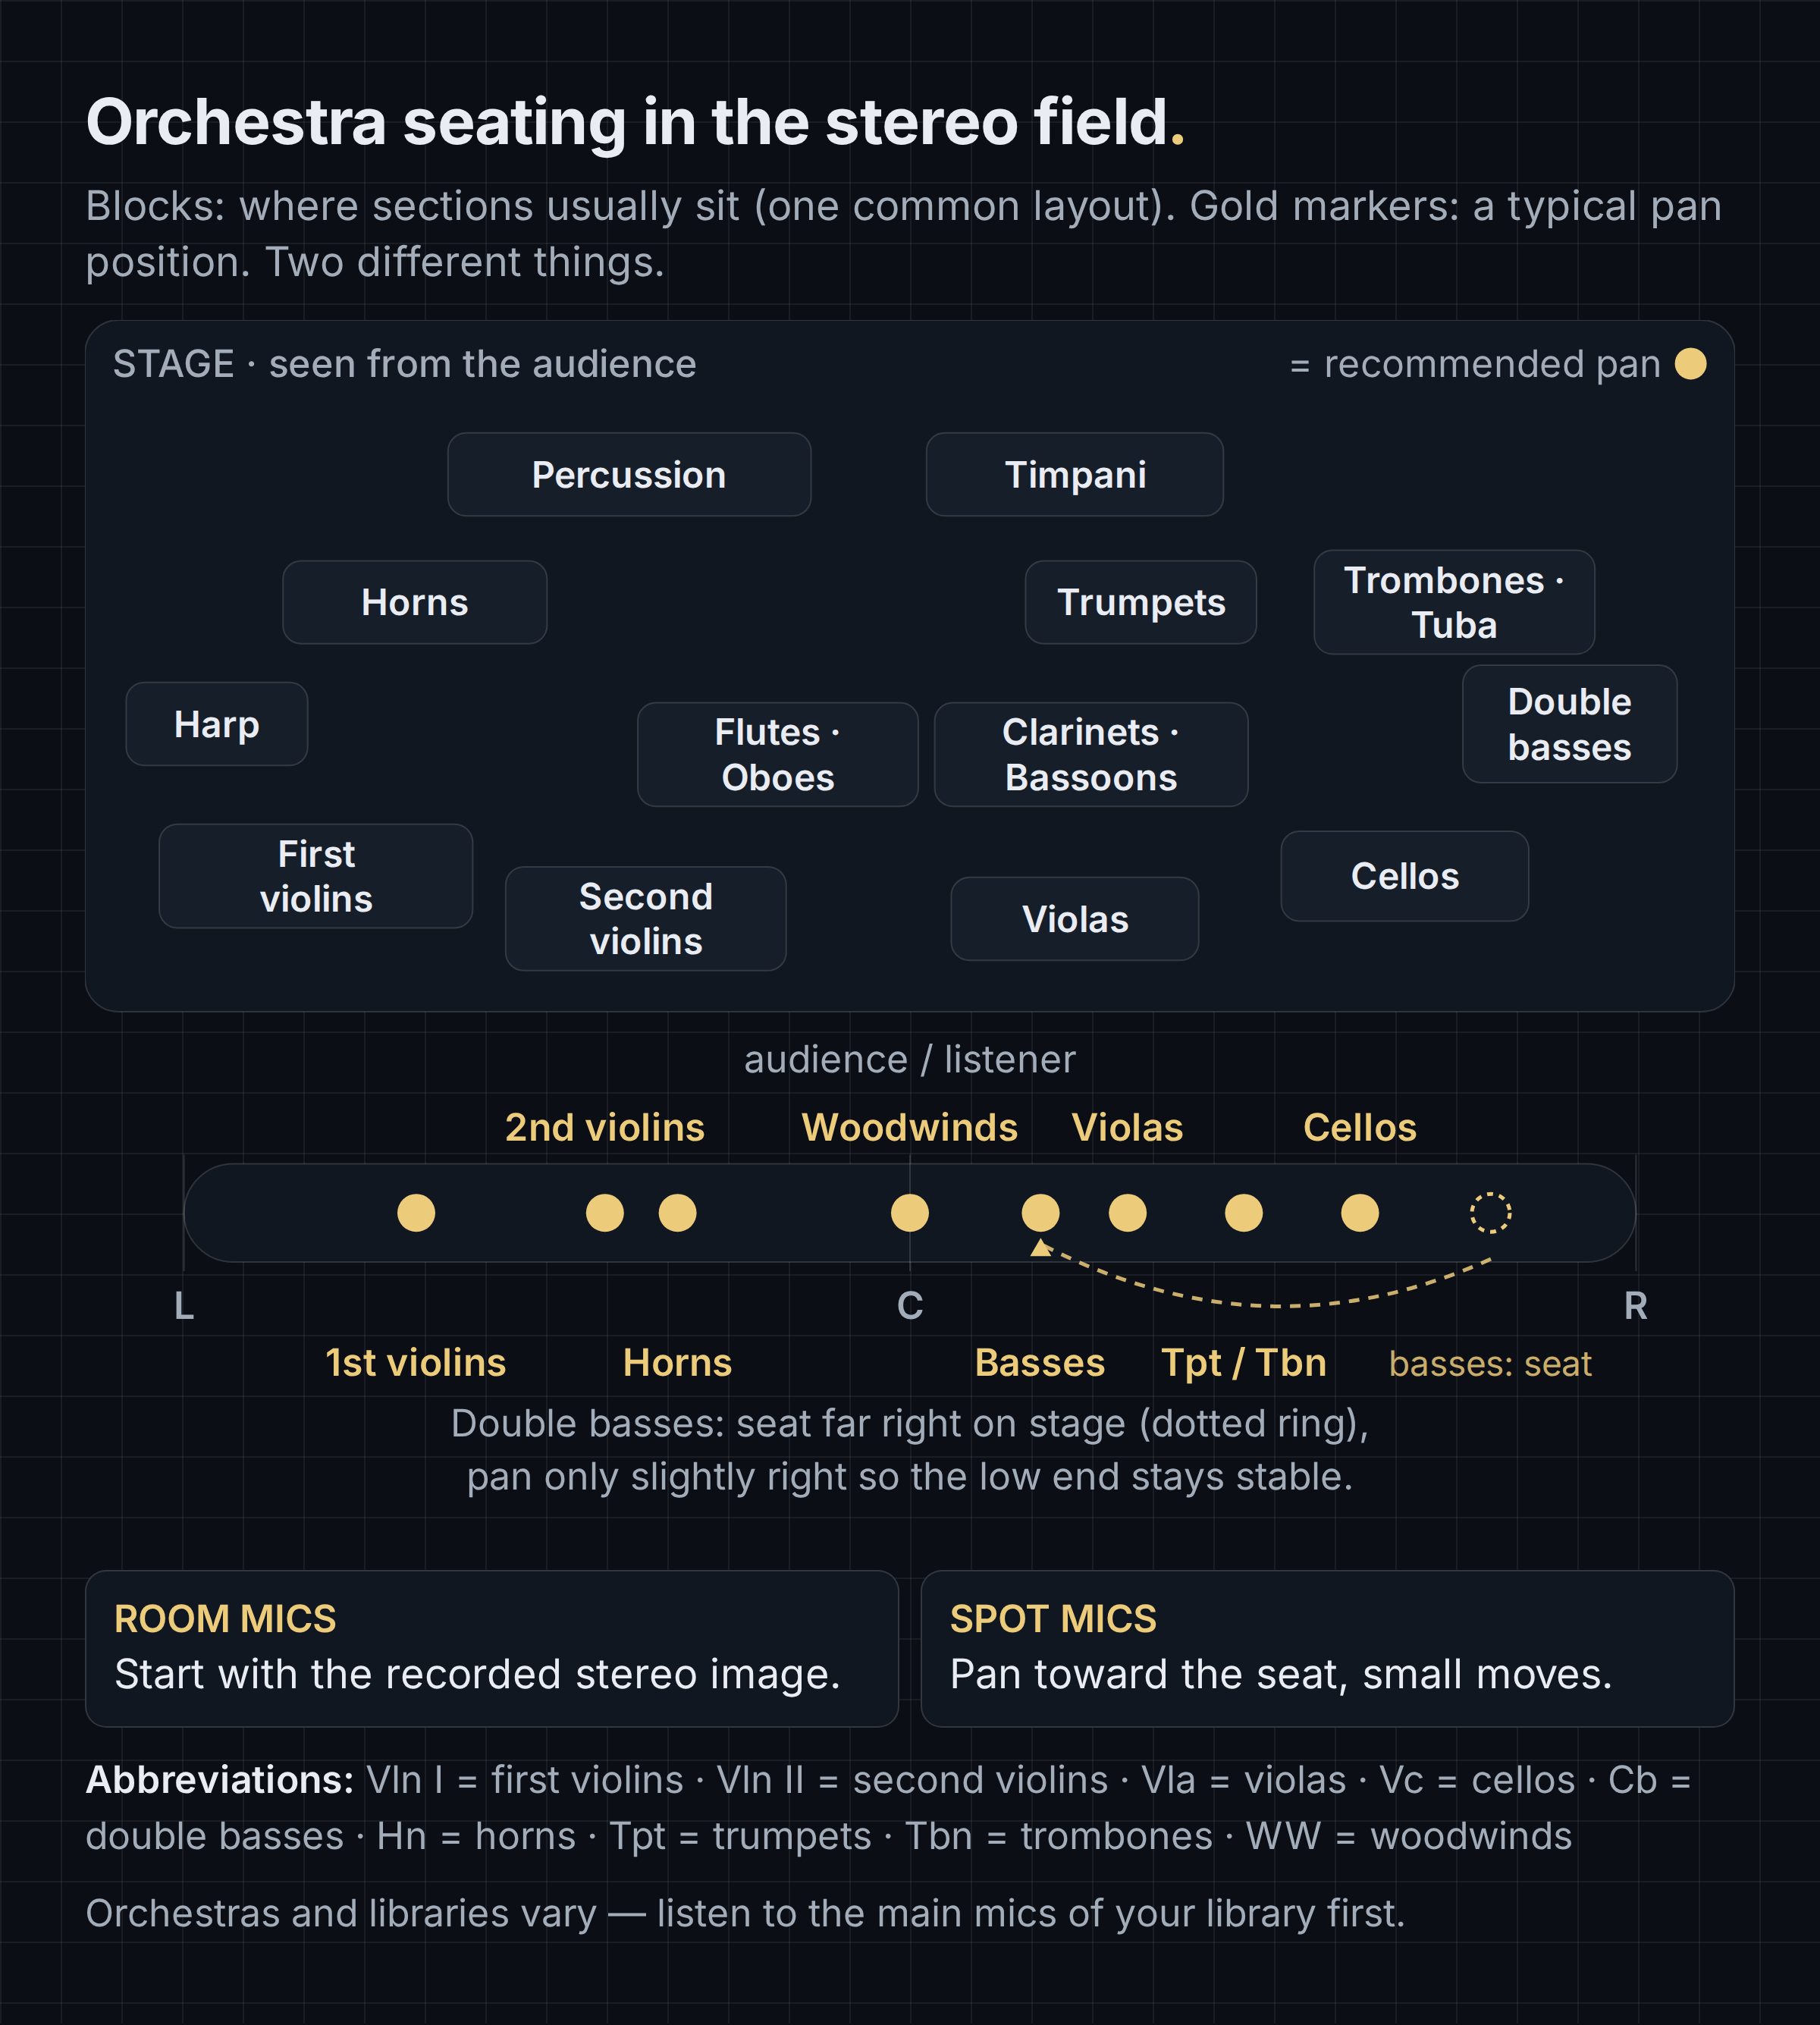
Solo the main mics of your string library and listen: violins left, celli right, basses right of center; in a brass library, horns left of center, trumpets and trombones right. Most modern libraries were recorded this way, and panning against it produces an image that fights itself.
There are two good reasons to pan at all: to unclutter the phantom center, and to match libraries from different developers so a switch mid-phrase is invisible. Both need small moves; on an already-panned library a few percent may be enough.
Start by moving the spot mics, not the room mics. A library's room perspectives carry its recorded stage image; shift them and you rotate the whole room. Other approaches exist, but this is the safest starting point. Close mics are usually mono and can be placed to the seat: first violins left, second violins less far left, violas right of center, celli right, basses only slightly right so the low end stays stable. Because reverb pulls everything toward the middle, you may end up panning slightly wider than feels right dry.
Panner behavior varies by DAW, so check yours. A balance control changes the relative levels of the left and right channels without cross-feeding them. That still changes the perceived image, and at extreme settings it can remove one channel entirely; what it leaves untouched is the content within each channel. A stereo, dual, or combined panner can also move the two channels independently or narrow the spread between them, which reshapes the recorded image in a different way. Neither is better in general: balance is the simpler move for a modest shift of a stereo source, a stereo panner the tool for deliberately narrowing a section recorded too wide or repositioning a piano whose high notes sit on one side.
If an instrument needs to sit on the other side of the stage, swap the left and right channels before panning. Direction in a stereo recording isn't only a level difference; the nearer mic also receives the sound earlier and brighter. Forcing a pan leaves those cues on the wrong side and produces an unfocused width; swapping mirrors them.
Extreme pan settings can change the balance and apparent width of a stereo recording. Listen for lost detail or an uneven room image, especially in sparse passages. Push a wet library hard to one side and you also move its captured room, and the sense that the players shared one space goes with it. Busy passages tolerate wider panning because elements left and right compensate each other; sparse intros don't. Joël's rule: "It's better to not pan enough compared to just panning too much."
Keep low frequencies near the center: sub bass and low percussion are hard to localize and destabilize the mix when panned. One caveat from our instructors: don't collapse orchestral basses to mono by default; they were captured by several mics in a room and should keep that image. Woodwinds are rarely wide in a real orchestra; a slight offset is usually enough.
Libraries are recorded by professionals, so problems tend to appear when you combine them: resonances that stack, low-mid build-up from several sections in the same register, harshness where close mics of different developers meet. Most real EQ work on an orchestra is therefore subtractive. (For the basics, start with our guide to what EQ is.)
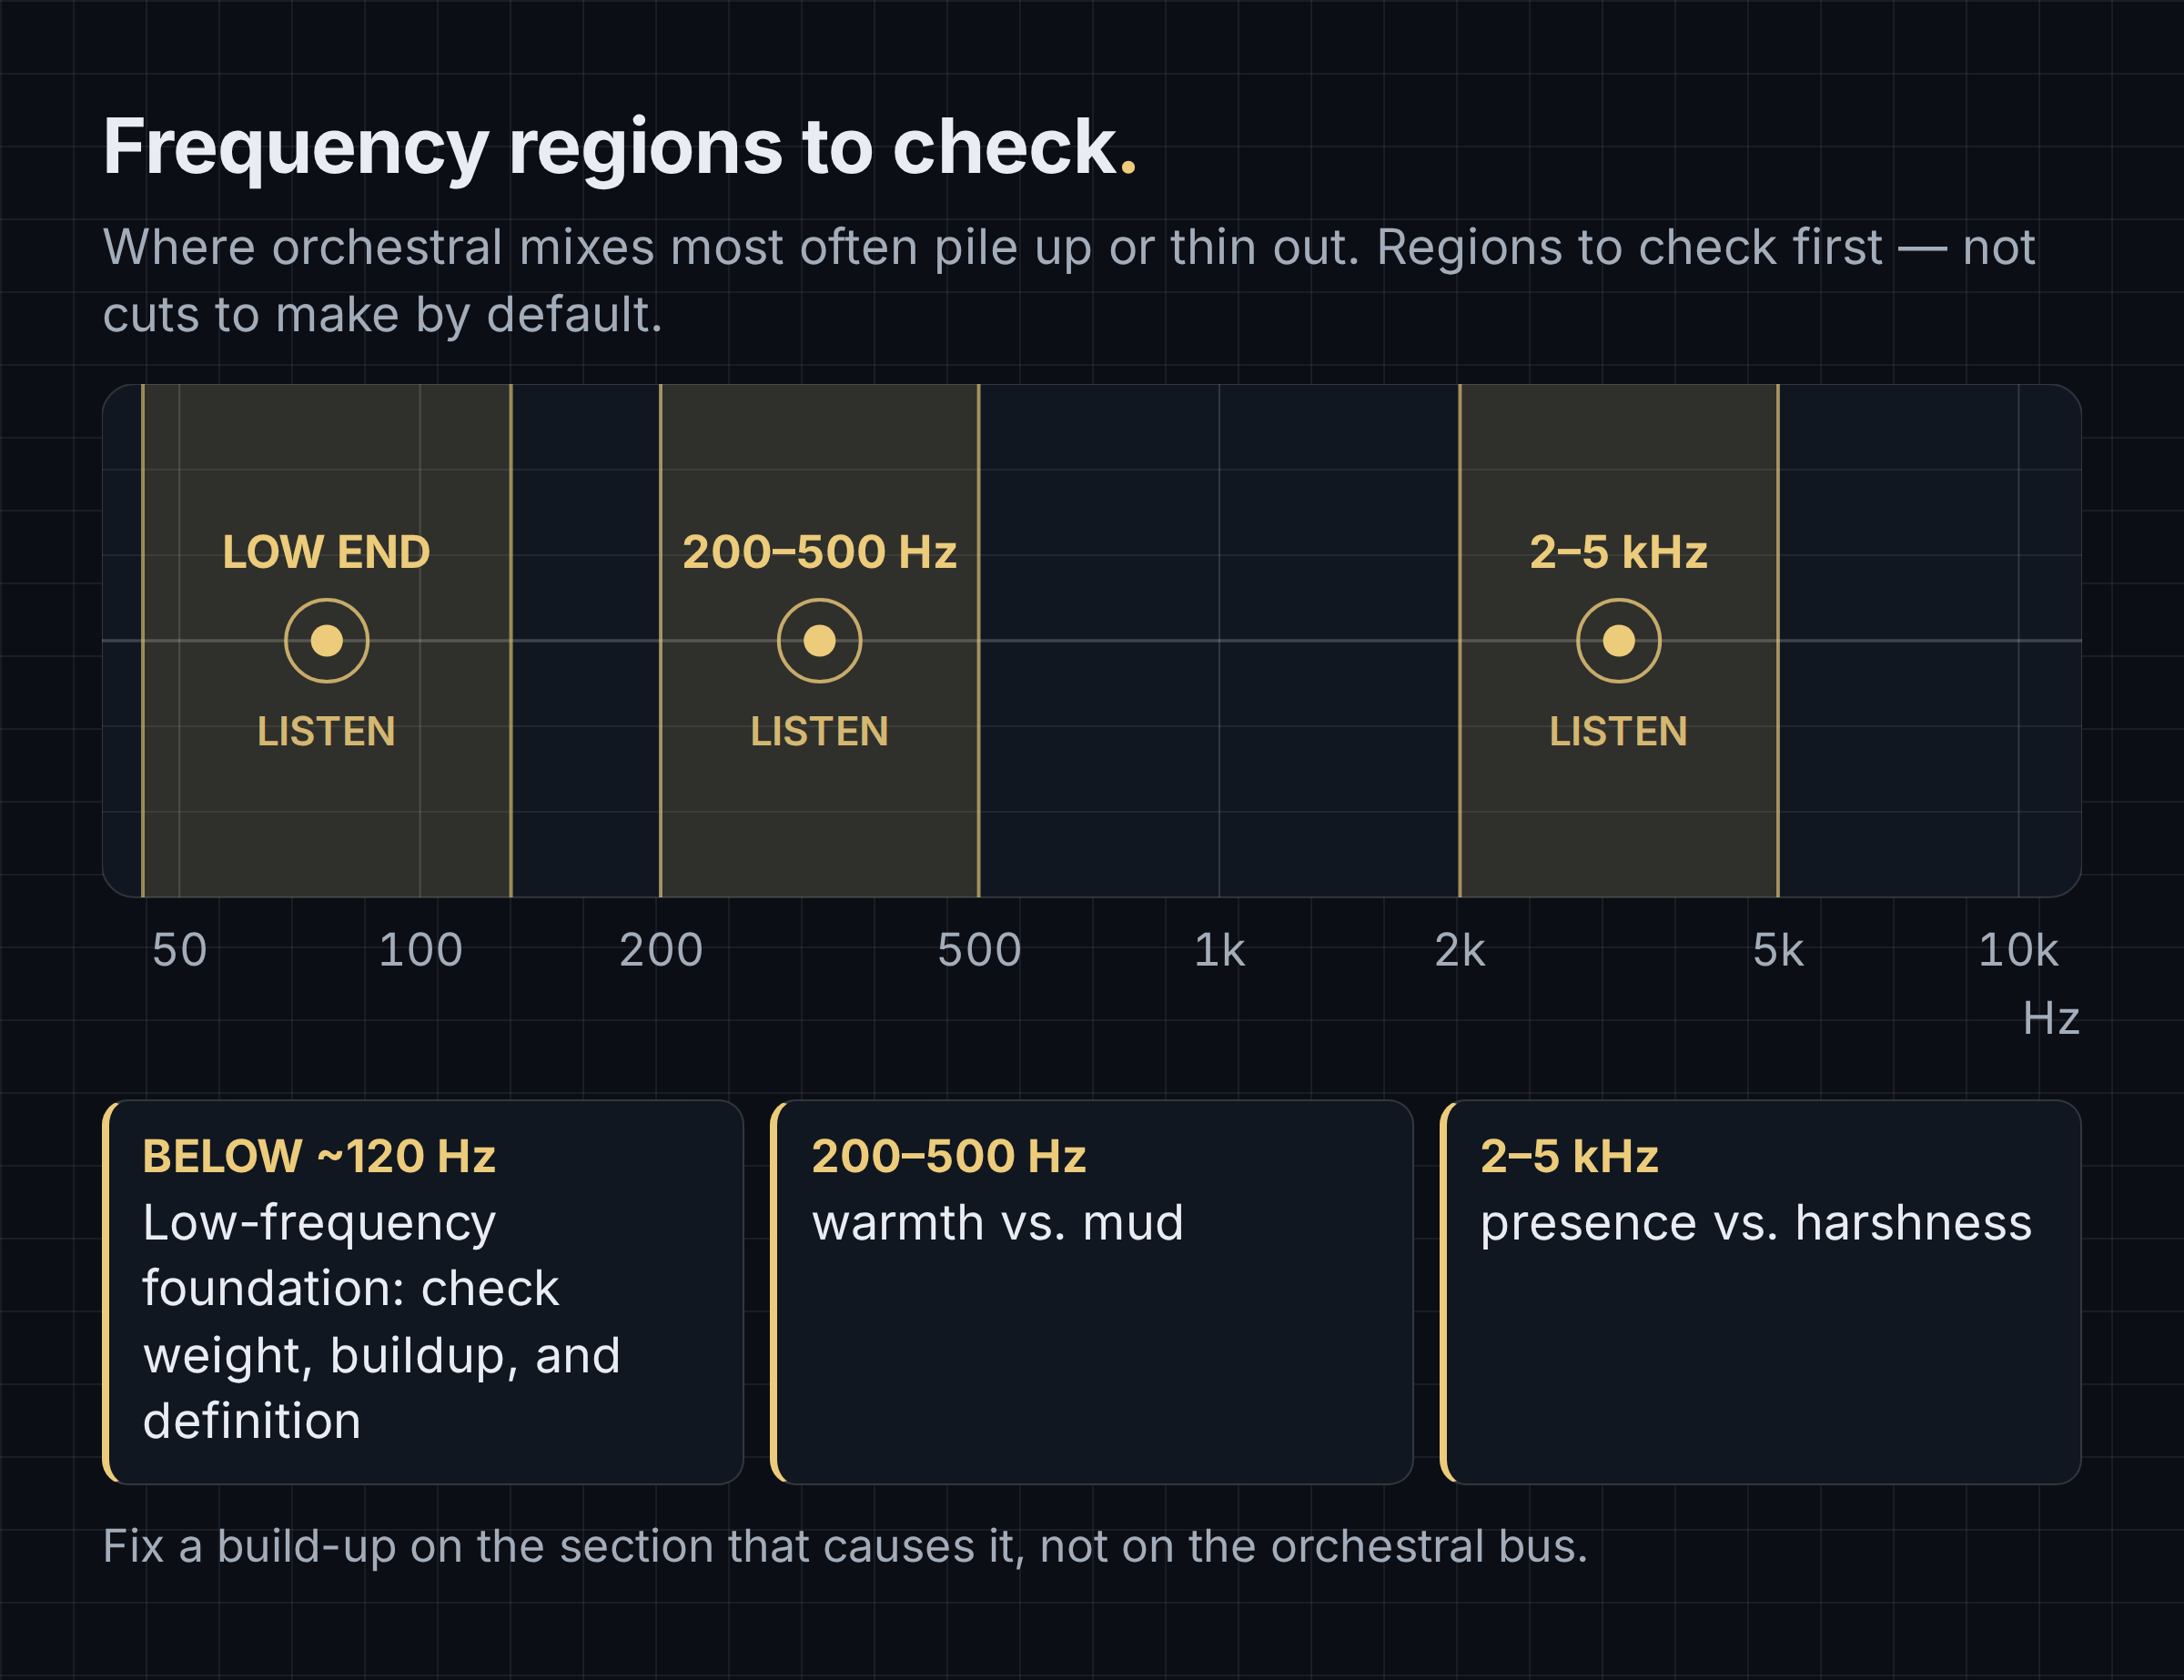
Two regions deserve attention. Between roughly 200 and 500 Hz lives the warmth of celli, low brass, and pads, and also most of the mud. Between roughly 2 and 5 kHz lives presence, and also the harshness that makes bright strings and trumpets fatiguing. Find the section causing a build-up and fix it there rather than on the orchestral bus, which would also hit the sections that were fine.
Before you EQ, check whether it's a balance problem: "nasal" woodwinds may just be oboes and bassoons sitting too loud. When you cut, bypass back and forth: does the mix sound better, or does it just look better on the analyzer? And don't over-clean. Cutting body from every channel is a trap even experienced mixers fall into; piccolo and horns turn thin, and the low-mids you removed were part of the glue.
Celli, basses, low winds, and low brass are resonant instruments recorded in resonant rooms: certain notes bloom louder than their neighbors, usually in the low-mids. A static cut would dull every note; a full-range compressor would grab the whole signal. A dynamic EQ band with a threshold only ducks that range when the resonance occurs. Joël describes it as a way to turn an EQ into a compressor, and in his orchestral mixes it's the dynamic tool he reaches for most often. Keep the moves small, and set each instrument by ear rather than copying a cello setting to the basses; their resonances sit in different places.
When a sound is hard to hear, ask whether another sound in the same range is covering it. That's masking, and the fix is often a level change or a narrow cut on the masking element, not a boost on the buried one. A dense accompaniment can also hide a hit's decay or reverb tail. Check whether extra reverb adds useful space or only buildup. And sometimes masking is what you want: a supporting layer that sits behind the melody is doing its job.
Know where each instrument's problems sit before you cut. If you want to know where a specific instrument's resonances and harshness tend to sit before you start cutting, the "How To EQ Orchestral Instruments" chapter in Mixing Cinematic Music goes through the orchestra one instrument at a time, from violins to tuba, timpani, harp, and choir, with a recap sheet you can keep next to your DAW. Start with the instrument that gives you the most trouble in your current mix. Explore the course
The mistake our instructors name most often is drowning everything in the same hall. Reverb can increase perceived distance, but a longer tail alone will not necessarily make a close recording sound farther away. Joël is explicit: "Reverb is not a complete fix for depth. The real fix for depth is proper recordings and proper mic positions." Before you raise a send, use the cheaper depth cues:
A close, dry flute sample with a long hall on top can still sound like a close flute with reverb on top. That's why mic positions come before reverb.
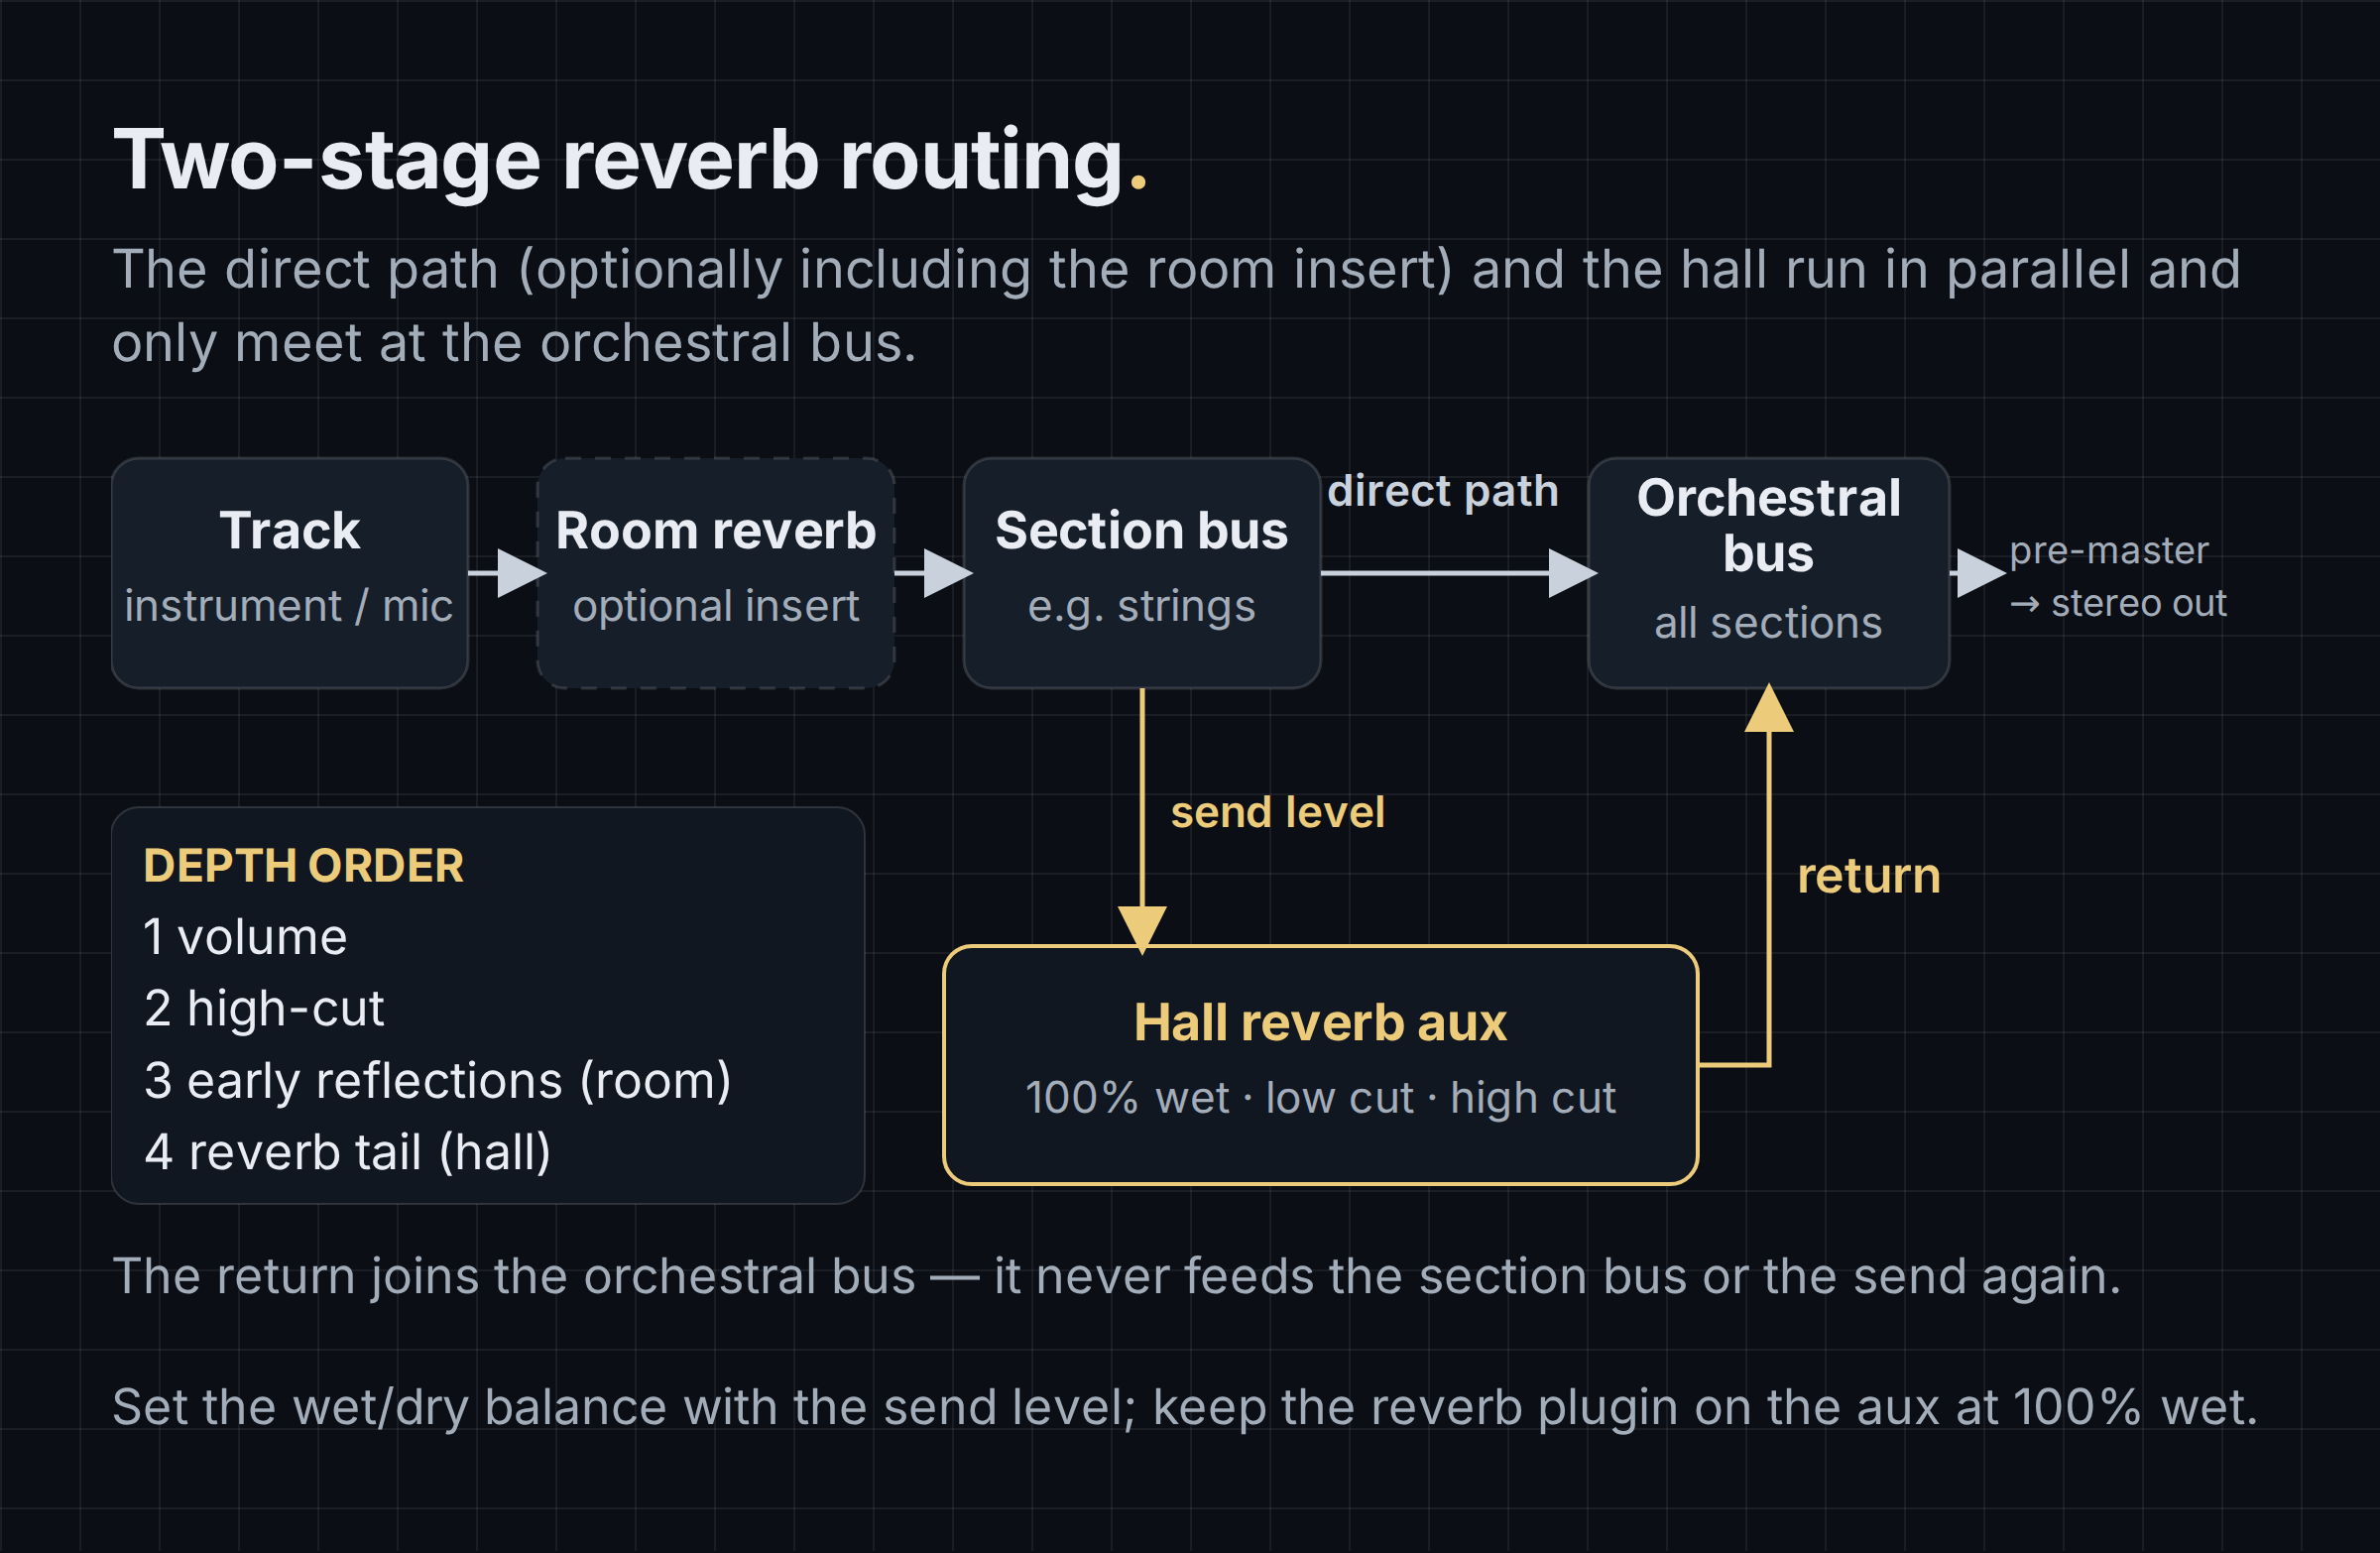
Our article on what reverb is covers the basics; here we only need what matters for an orchestra. Most of the templates our instructors showed use two stages, the first of them optional:
Use one space for the whole orchestra and vary depth with send amounts, the room stage, or high-cut, not with different halls per section. Convolution reverbs (sampled impulse responses of real halls) are realistic but static; many algorithmic reverbs can add modulation to the tail, which several of our instructors compare to round robins for the room. Combining a convolution room with an algorithmic hall is common.
Joël's personal simplification: once he has a reverb sound he likes, he reuses it from mix to mix and mostly adjusts decay and send levels. Treat that as a time-saver, not a complete recipe for every production.
Compression is easy to overdo on an orchestra, and audible pumping is one of the quickest ways to make a mock-up sound like one. Sections rarely need it for a physical reason: recorded from a distance, their dynamics are already smoothed by the room, and a dozen players average out each other's inconsistencies. Joël's rule: "Always use a compressor with intent." Choose the tool by the problem:
Where full-range compression often belongs: Solo instruments and vocals have a large dynamic range, and their quiet phrase endings can get buried in a dense mix. Cinematic drums benefit from envelope shaping: attack controls how much of the initial transient passes through, release shapes how the gain reduction recovers, and together with makeup gain these settings make the sustain of a hit more prominent (Joël works with attack times around 10–30 ms). Synths and sound design follow their own rules.
Light bus compression can glue a mix: on an orchestral bus or master, a decibel or two of gain reduction at a low ratio with a slow attack. A high-pass filter in the compressor's detector keeps big low hits from pulling the whole orchestra down; that's an internal sidechain filter, not external sidechain ducking, where another track's signal triggers the compressor (a hit ducking a pad, for instance). Several of our instructors use gentle tape or console saturation on section buses instead of a compressor: it tames peaks and thickens the sound in small doses.
Start with the width already present in the recordings and create contrast through placement: violins left, basses right, horns left, trumpets right, winds near the center build a left–right picture on their own, and some elements have to stay narrow for the wide ones to feel wide. Add widening only where it improves the mix (a background pad or an atmosphere is a typical candidate), then check the result in mono.
The loss of left–right separation in mono is normal; what you're listening for is unexpected cancellation, pronounced tonal changes, or important parts becoming much weaker. An instrument that disappears or a section that suddenly sounds hollow is a reason to check that element for phase problems between its left and right channels, not proof of one. A mono-sum switch on your monitor controller or a utility plugin works on any system, headphones included; what hides problems is only ever listening in stereo. As one of our instructors puts it, a mix that only sounds good in stereo is half finished.
These come up repeatedly in the mixes our instructors review:
If a mastering engineer or publisher handles the final stage, stop before final compression and limiting, leave headroom, and deliver stems if asked. For demos, keep the chain modest. Joël's rule of thumb: if the master needs more than about 1.5 dB of EQ, go back to the mix, because a master EQ affects every instrument at once. Glue compression at a low ratio with a decibel or two of gain reduction and a limiter (or two in series, each doing little work) is usually all an orchestral master needs. Sustained material such as soft strings and piano starts to wobble when limited hard; drum-heavy hybrid tracks take more.
Our Music Composition & Orchestration Courses
Our Music Production Courses
Our Music Trailer Courses
See All CoursesHow do you mix orchestral samples so they sound realistic? Work with what the library already contains: start with its recorded room image, pan spot mics only a little, and use one hall for everything (plus a short room stage if libraries from different studios don't blend). Build depth with volume and high-cut before reverb, use dynamic EQ for resonant notes, and check in mono.
How much reverb should orchestral music have? It depends on how wet the source already is. Across our instructors' templates, hall decays of roughly 1.8 to 2.5 seconds were typical, with the plugin at 100% wet on an aux and a low cut to keep bass out of the tail. Libraries recorded in a large hall with ambient mics need little added reverb; dry libraries and modeled instruments need more.
Should you compress orchestral strings? Rarely with a full-range compressor; sections were recorded from a distance and average out their own dynamics. Use dynamic EQ for resonant notes, automation for level swings, and parallel compression for a little extra density on short articulations. Solo strings are different and often benefit from full-range compression.
How do you pan an orchestra? Follow the seating: first violins left, second violins less far left, violas right of center, celli right, basses slightly right, horns left, trumpets and trombones right, woodwinds near the center. Move spot mics rather than room mics, keep the recorded image unless you intend to change it, and swap channels instead of forcing a pan when an instrument sits on the wrong side.
What's the difference between mixing a live orchestra and a sampled one? With samples you control pan, EQ, and level of every patch, and the danger is over-processing. With a live recording the main mics carry the whole ensemble, so repositioning them moves everything, bleed limits how far you can push spot mics, and the balance is largely fixed by the session. In return, the session sounds like one event by itself. Sampled sections were recorded separately, so their coherence depends on how well the libraries match (room, mic perspectives, seating) and on the shared reverb and panning you give them.
Learn with Master The Score
Courses on composition, orchestration, music production, trailer music and sound design, from composers writing for film, games and media. Students also get exclusive discounts on leading sample libraries and plugins.
Discover all courses →


Online education for media composers — orchestral writing, trailer music, mixing and more, taught by working professionals.


