

Mock-up Production
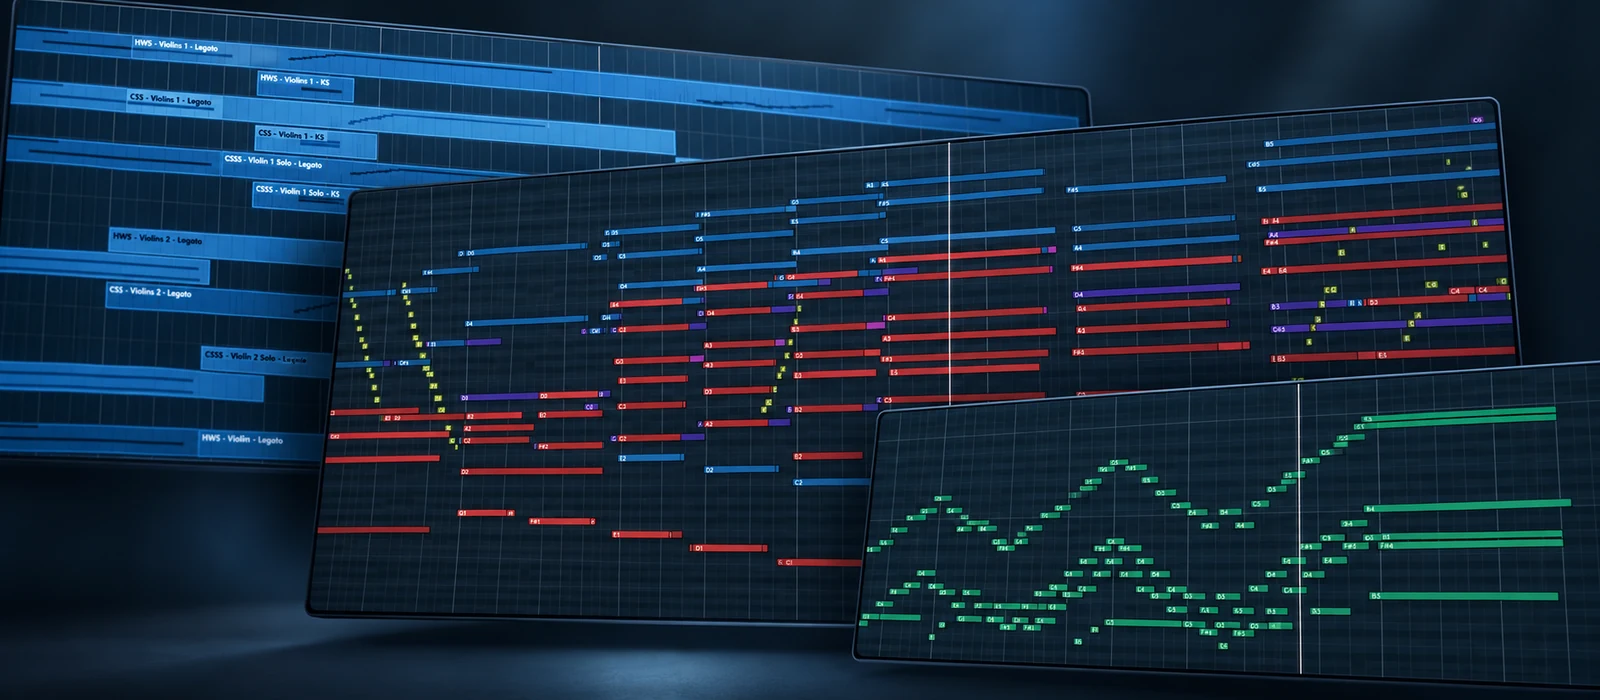
Rico Derks is a Dutch composer. His music has been used for various TV shows, documentaries, and films in the Netherlands. Besides being a professional film composer, Rico is a genius when it comes to professional mock up production.
An orchestral mockup is a digital performance of an orchestral score, usually built with MIDI and sampled instruments. It may serve as a demo before a live recording or become the finished production. Making it convincing means shaping not just which notes play, but how they begin, connect, change intensity, and end.
Most mockups that sound "sampled" fail at a few recognizable points, from strings held without shape and short notes that arrive late to libraries with mismatched spatial characteristics. This guide explains what causes each problem and which options you have. The craft comes largely from Rico Derks's teaching in The Virtual Orchestra and Orchestral Template Creation.
What a mockup has to achieve depends on its job: a demo that only has to win approval before a live recording can be rougher than a mockup that is the final product, which is the case this article assumes. For game music especially, the mockup often is the released recording (our guide to how to make video game music covers the composition side).
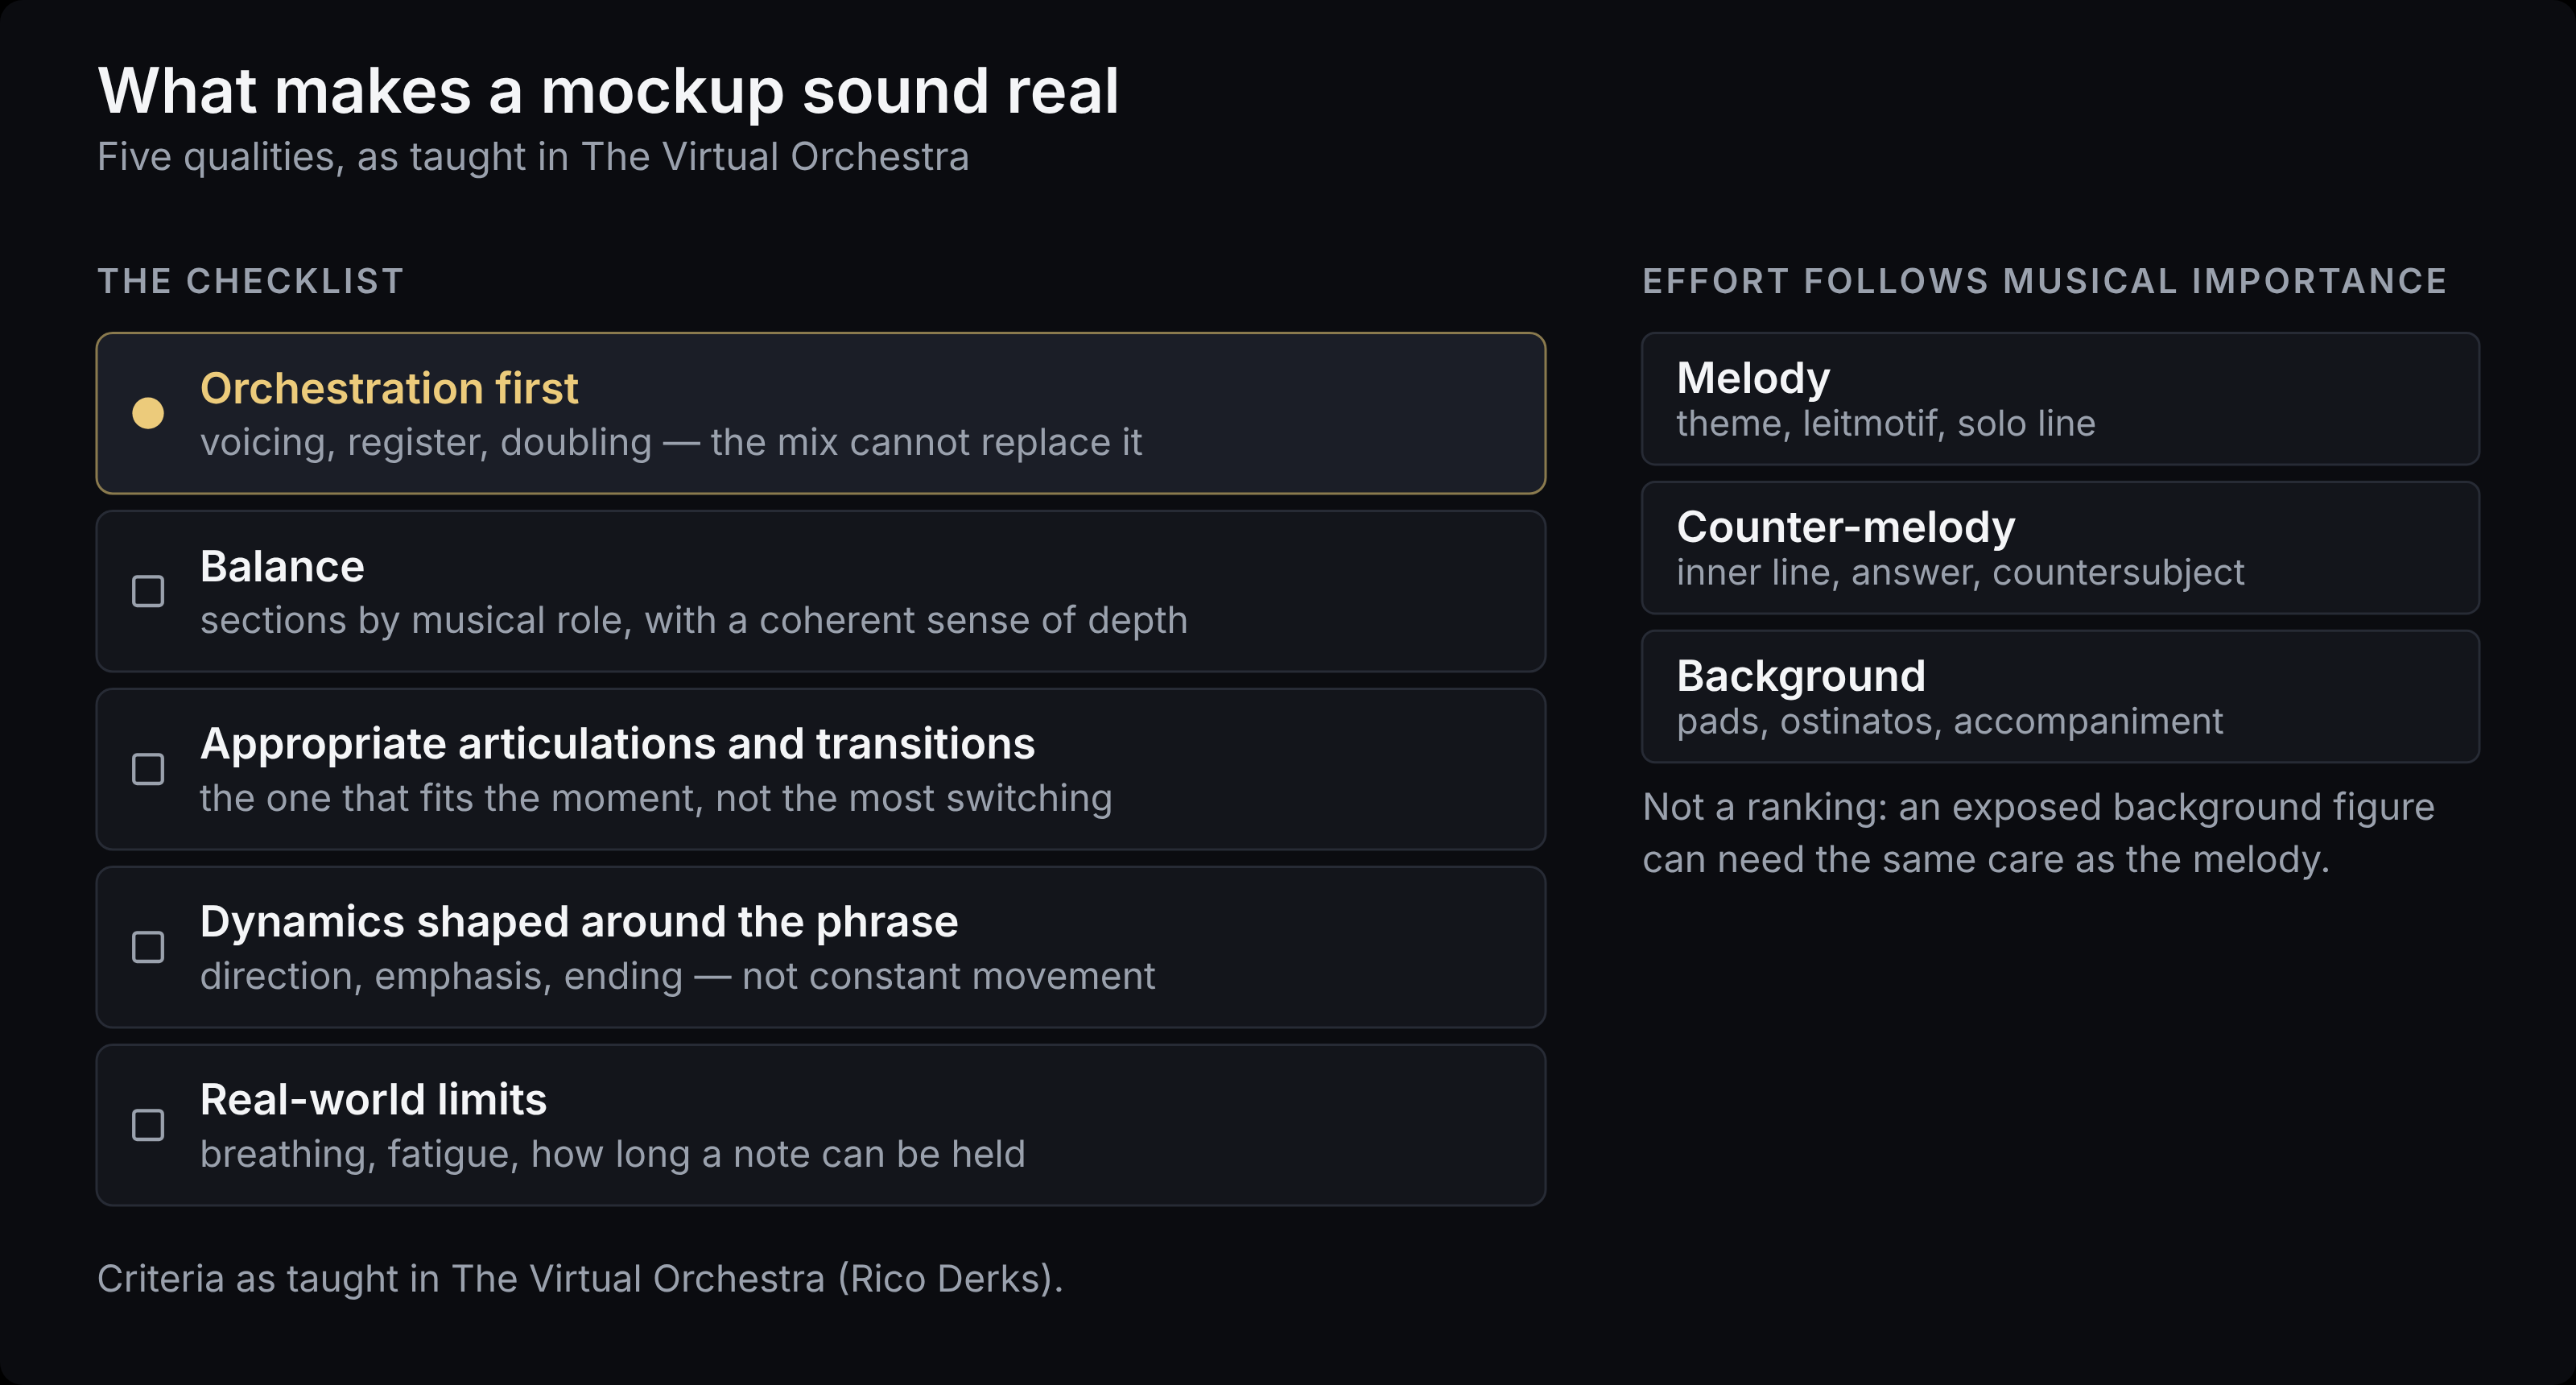
Five qualities matter most.
Balance. Balance sections according to their musical role while maintaining a coherent sense of depth; a woodwind solo can stand at the front of the mix without the section losing its place in the room.
Appropriate articulations. Developers record several short-note lengths and kinds of transition. Realism comes from choosing the one that fits each moment, not from switching as often as possible. A passage can work with a single articulation; what gives a mockup away is an articulation that does not fit the tempo, the accents, or the phrasing.
Dynamic shaping. Shape dynamics around the phrase: its direction, emphasis, and ending. A sustained passage may need very little movement; arbitrary fluctuations can make it sound less natural. In Rico's experience, strings are where this most often goes wrong.
Real-world limits. Brass and woodwind players breathe, string players tire on long tremolos, and a fortissimo cannot be held indefinitely. A sampled horn section can hold a loud chord for the whole cue, and listeners often sense that something is off even if they cannot name it.
Orchestration above all.
"Then finally, and that's the most important one actually, is good orchestration." — Rico Derks, The Virtual Orchestra
When competing parts crowd the same register, revisit voicing and balance before relying on EQ; a cut that fights the orchestration tends to thin the sound without clearing it. The course walkthroughs of a cue by composer Benny Oschmann show the other side: the orchestration is strong enough that nearly hard-quantized MIDI still yields a convincing, humanized mockup.
Where the hours go. Effort follows musical importance. Rico colors his tracks in three layers: melody, counter-melody, and background. Most of his time goes to the top one, whether a theme, a leitmotif, or a solo line; an exposed background figure can still need the same care.
Learn what players can do, approach the mockup that way, and depart from it where the result stops working.
"Approach everything as realistic as possible until it doesn't work, until it doesn't work in the mock-up. And that's the spot where I cheat." — Rico Derks, The Virtual Orchestra
His departures are candid. Playing a three-note chord on a six-horn ensemble patch can trigger the full sampled section on each chord tone, rather than divide six players among the notes; that can create a much larger sound than the intended scoring, and it can still sound great. Learning the constraints first is what makes the result believable; his golden rule is that if it sounds good, it is good.
Libraries that already have the sound you are after make the rest of the work easier; libraries that do not may need more adjustment, or a swap, before the programming pays off. (For the basics, see our guide to virtual instruments.)
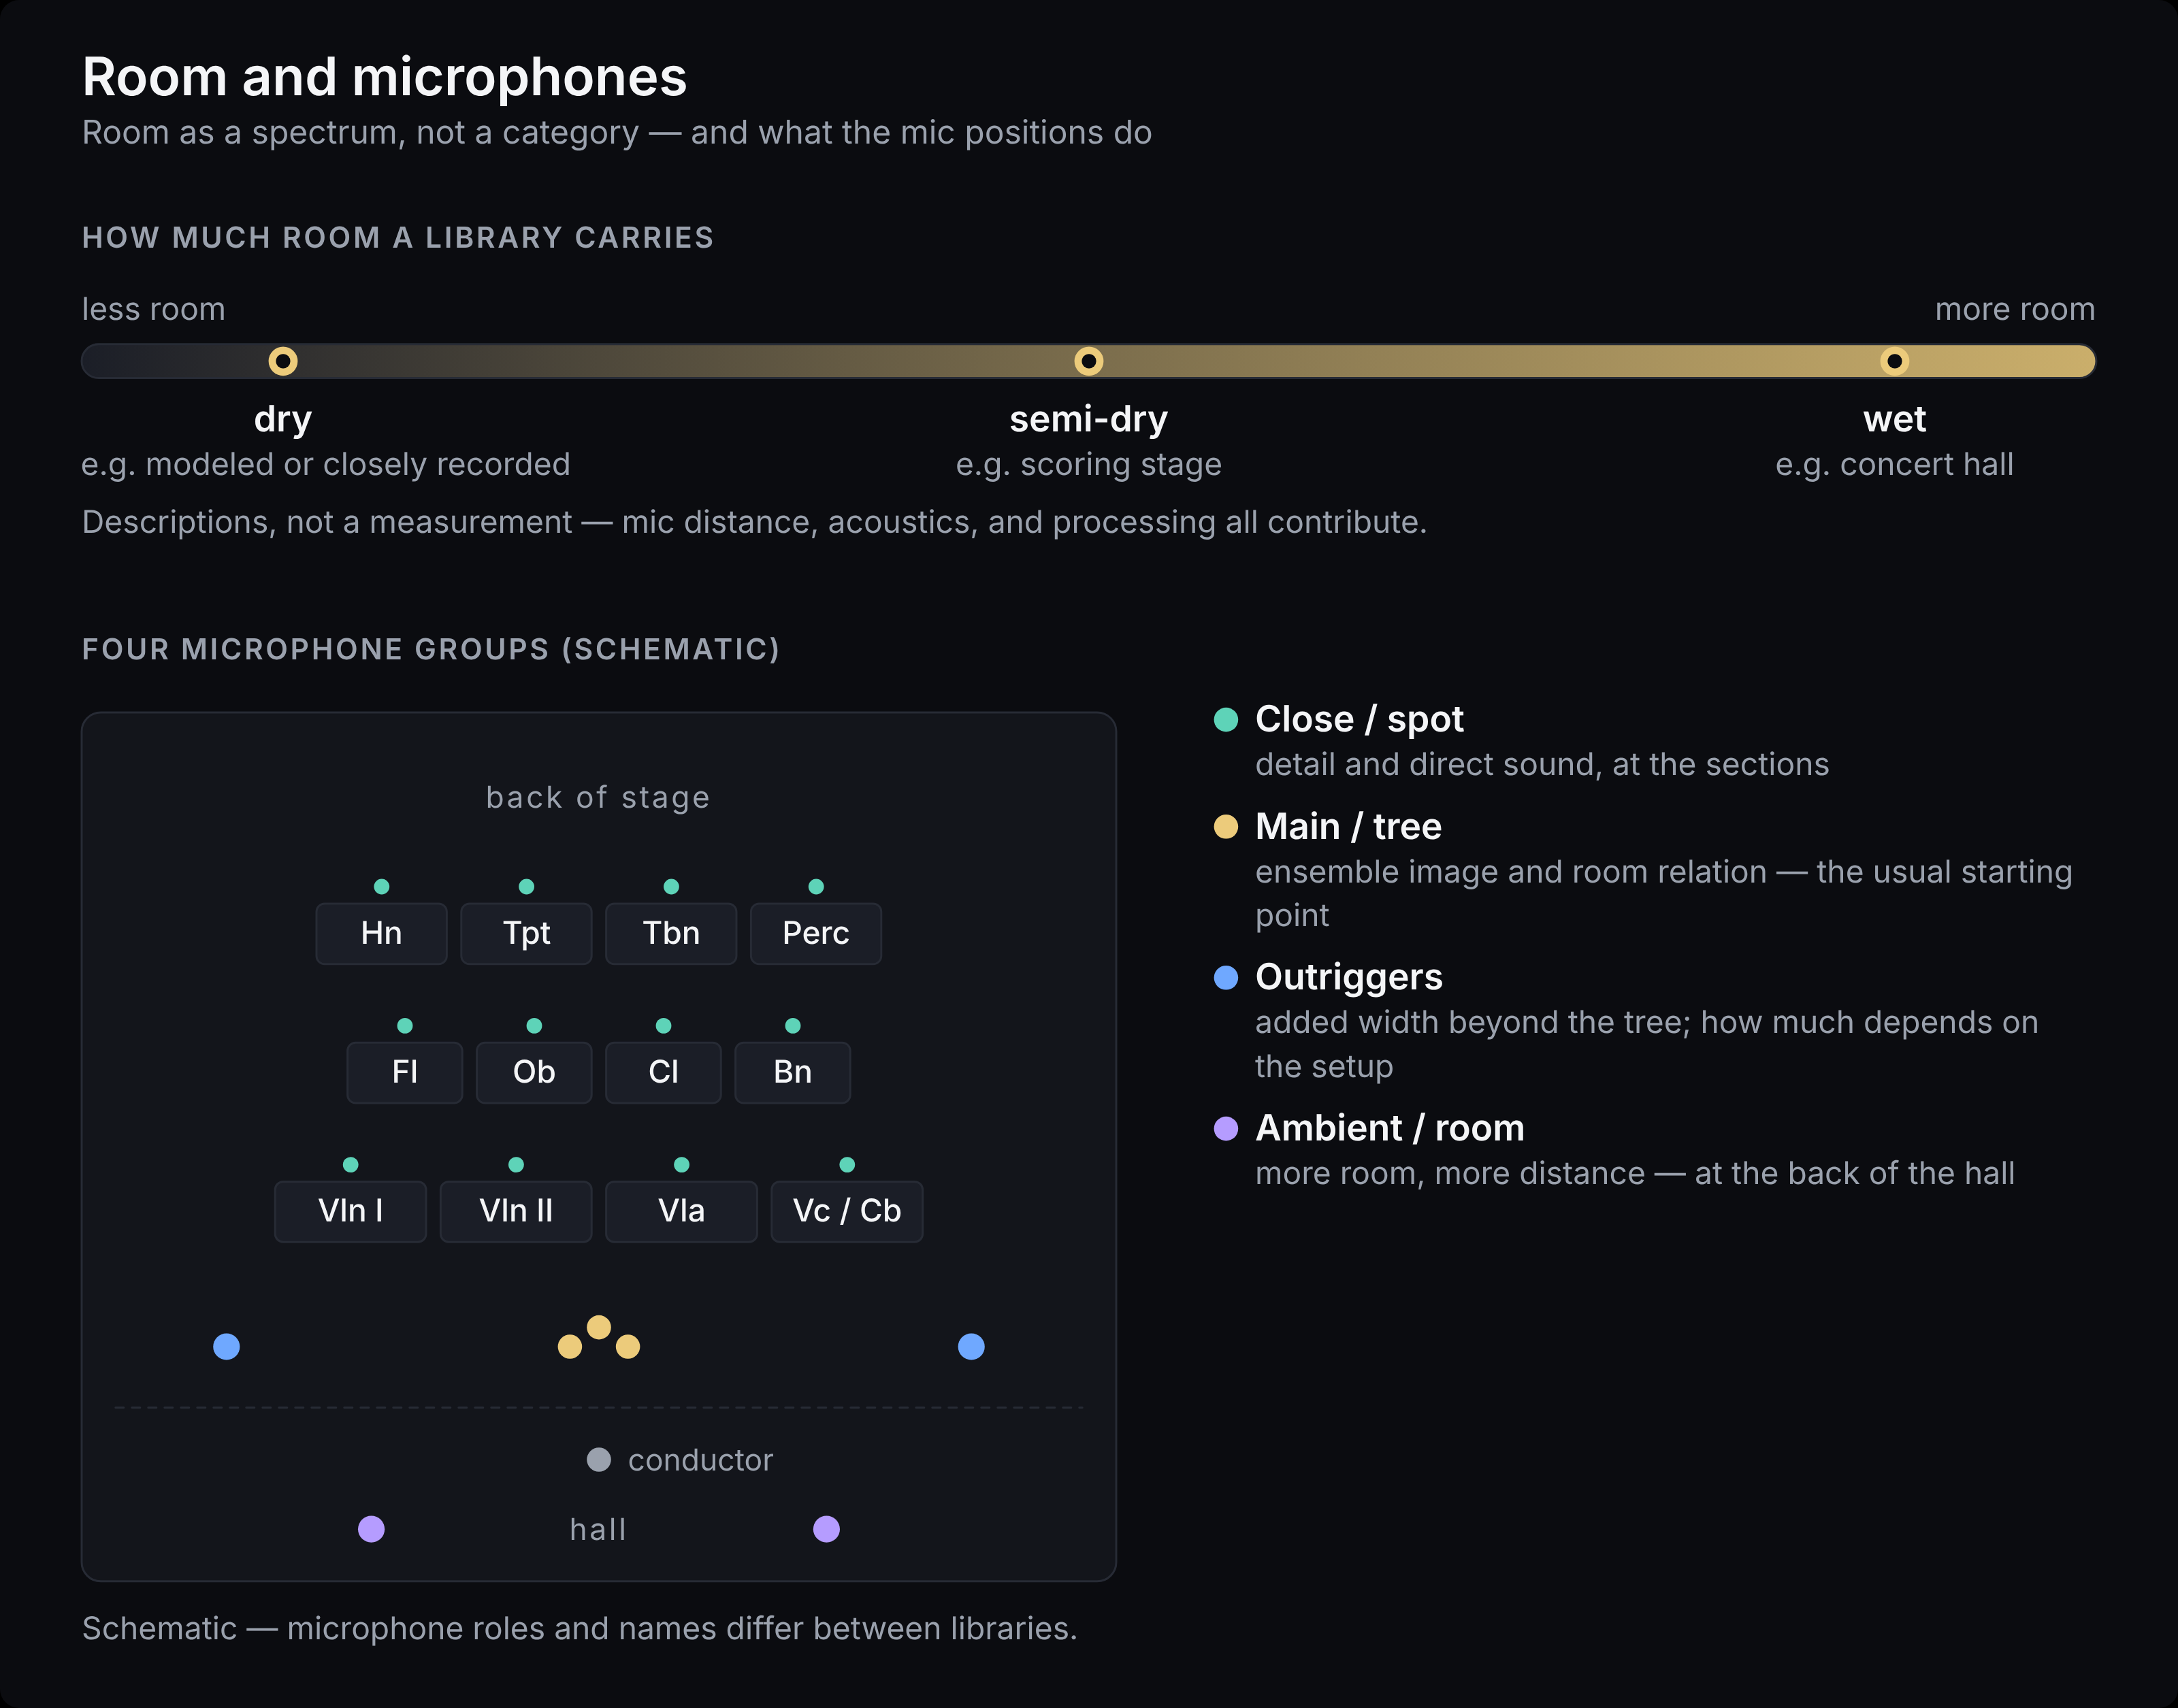
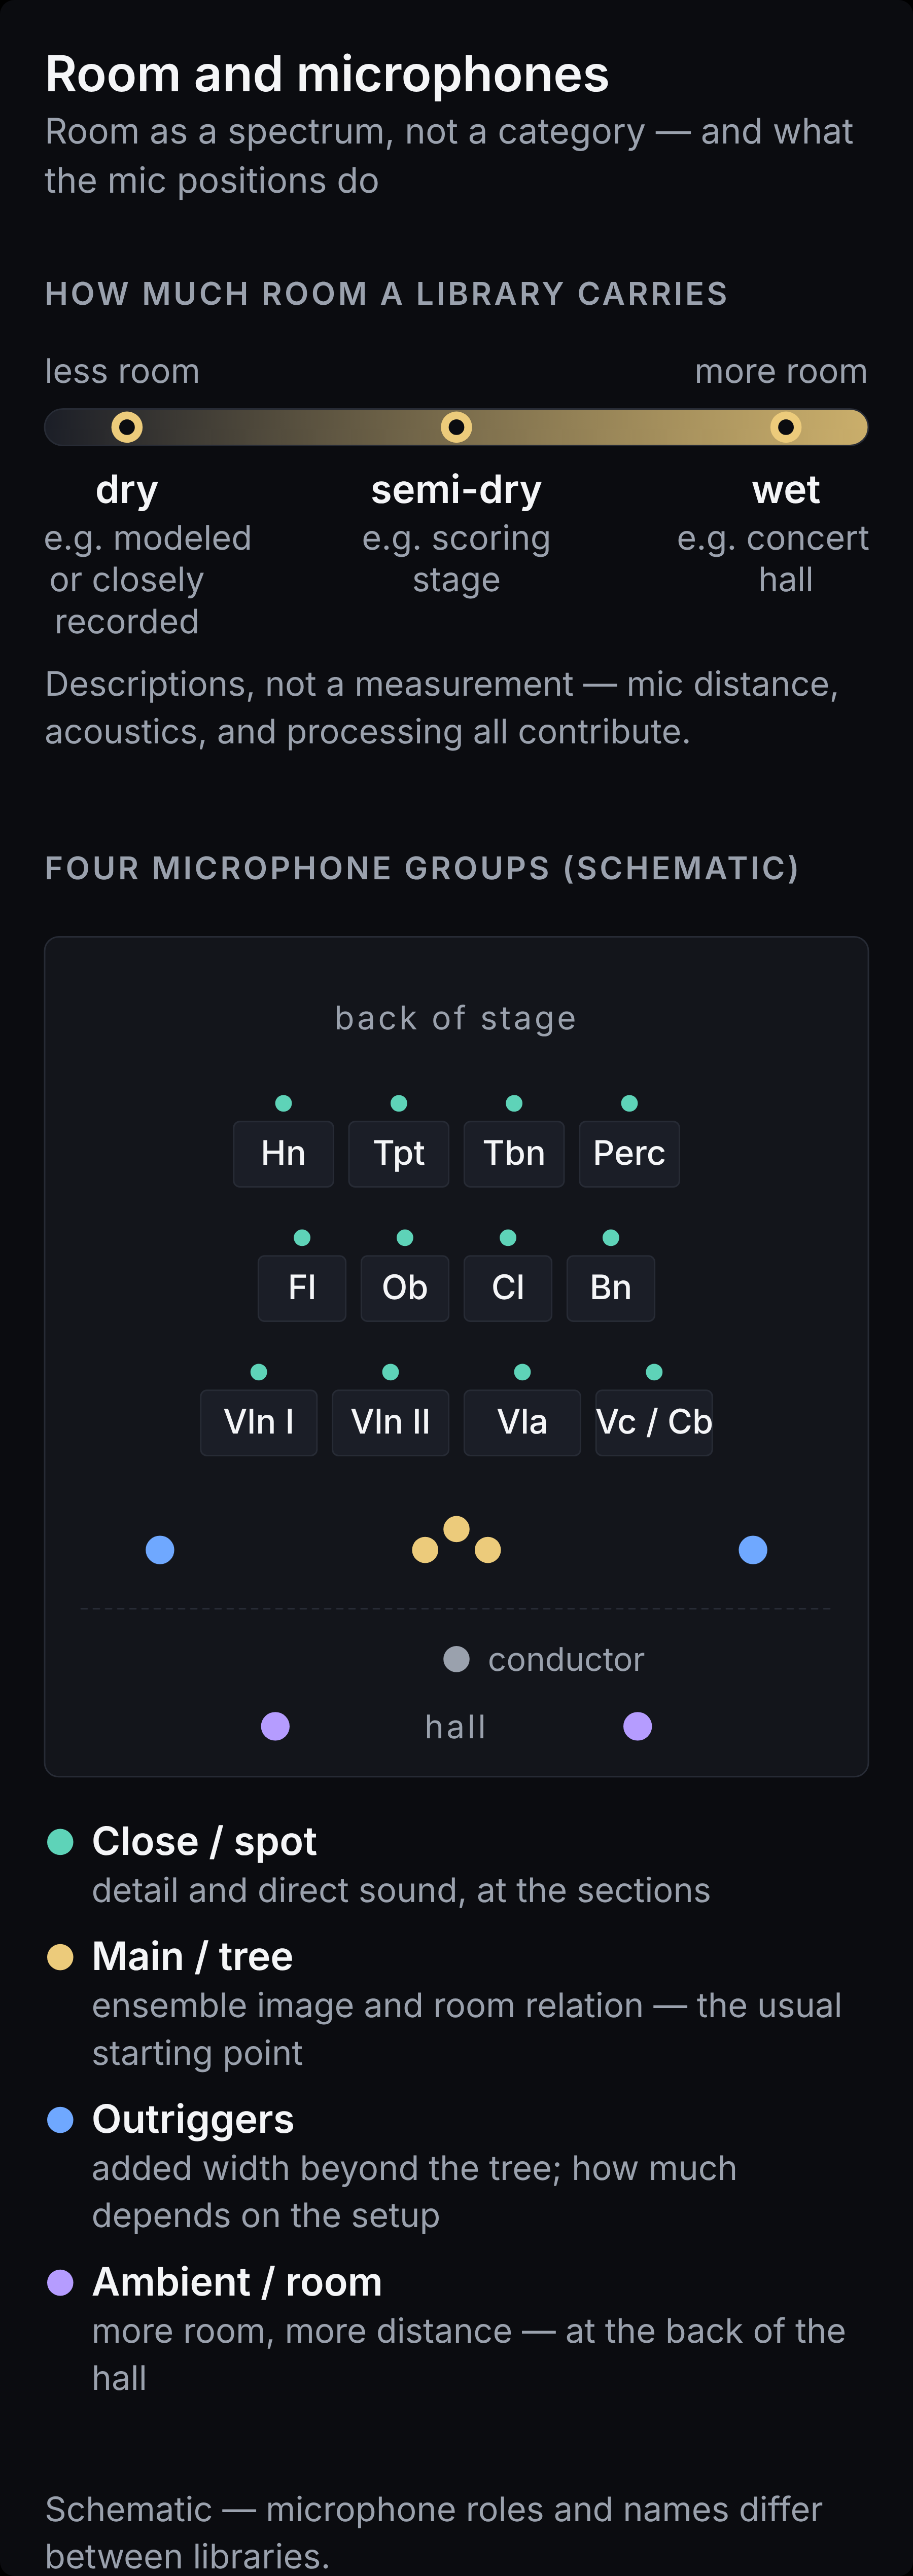
A useful way to describe libraries is by how much room they carry. A wet sound contains a substantial amount of recorded room ambience, often associated with more distant microphones or reverberant spaces; a large concert hall is the typical example. Semi-dry libraries carry room with a shorter decay; many scoring stages sound this way. Dry instruments, modeled or closely recorded, carry little or no space, so you place them yourself. These are descriptions, not a measurement: microphone distance, the room's acoustics, and the developer's processing all shape how wet a library sounds.
No category is better; the descriptions help with combination. Libraries with a similar amount of room tend to sit together more easily, including across brands. Very different rooms can still be combined, but the difference is audible and has to be handled deliberately: added reverb does not remove the room already in a recording, though it can help a drier source sit in a wetter context. In Rico's experience a wetter library behind a drier core orchestra, such as hall-recorded percussion behind scoring-stage strings, reads as depth, while a small-room section in front of a hall-recorded orchestra tends to feel out of place. Before buying, listen to demos without added reverb so you hear the room itself. A product family designed as one orchestra is cohesive out of the box; Rico still prefers combining developers, because the same articulation sounds different between brands and no single library records every articulation, on the condition that they share a similar amount of room.
A sampled instrument's dynamics are not continuous: the developer records a note at several dynamic levels, and the controller crossfades between those layers or selects one. In many orchestral patches, a programmed crescendo moves through or blends recorded dynamic layers across the range the phrase needs, and on an exposed line the crossing point can sometimes be heard. More layers can smooth that, but the result also depends on how the developer matched the recordings, so a layer count alone promises nothing. Repeated notes are usually served by round robins, alternative recordings of the same note; whether the engine avoids firing the same recording twice in a row depends on the implementation. Both approximate something a player does continuously, which is why the techniques below exist.
Most orchestral libraries ship several microphone positions. Main or tree microphones (often a Decca tree) carry the basic ensemble image and its relation to the room, and are the usual starting point. Close or spot microphones add detail and direct sound, and bring one section forward against another. Outriggers add width beyond the tree; how much depends on the recording setup. Ambient or room microphones add a stronger room component and distance. A pre-mixed "mix" position is convenient, but in most libraries its fader changes only the overall level; the balance between the microphones inside it is fixed. Each position also costs RAM, CPU, and disk bandwidth.
Much of a mockup's expressiveness lives in a handful of MIDI messages, and many problems come from asking them to do the wrong job.
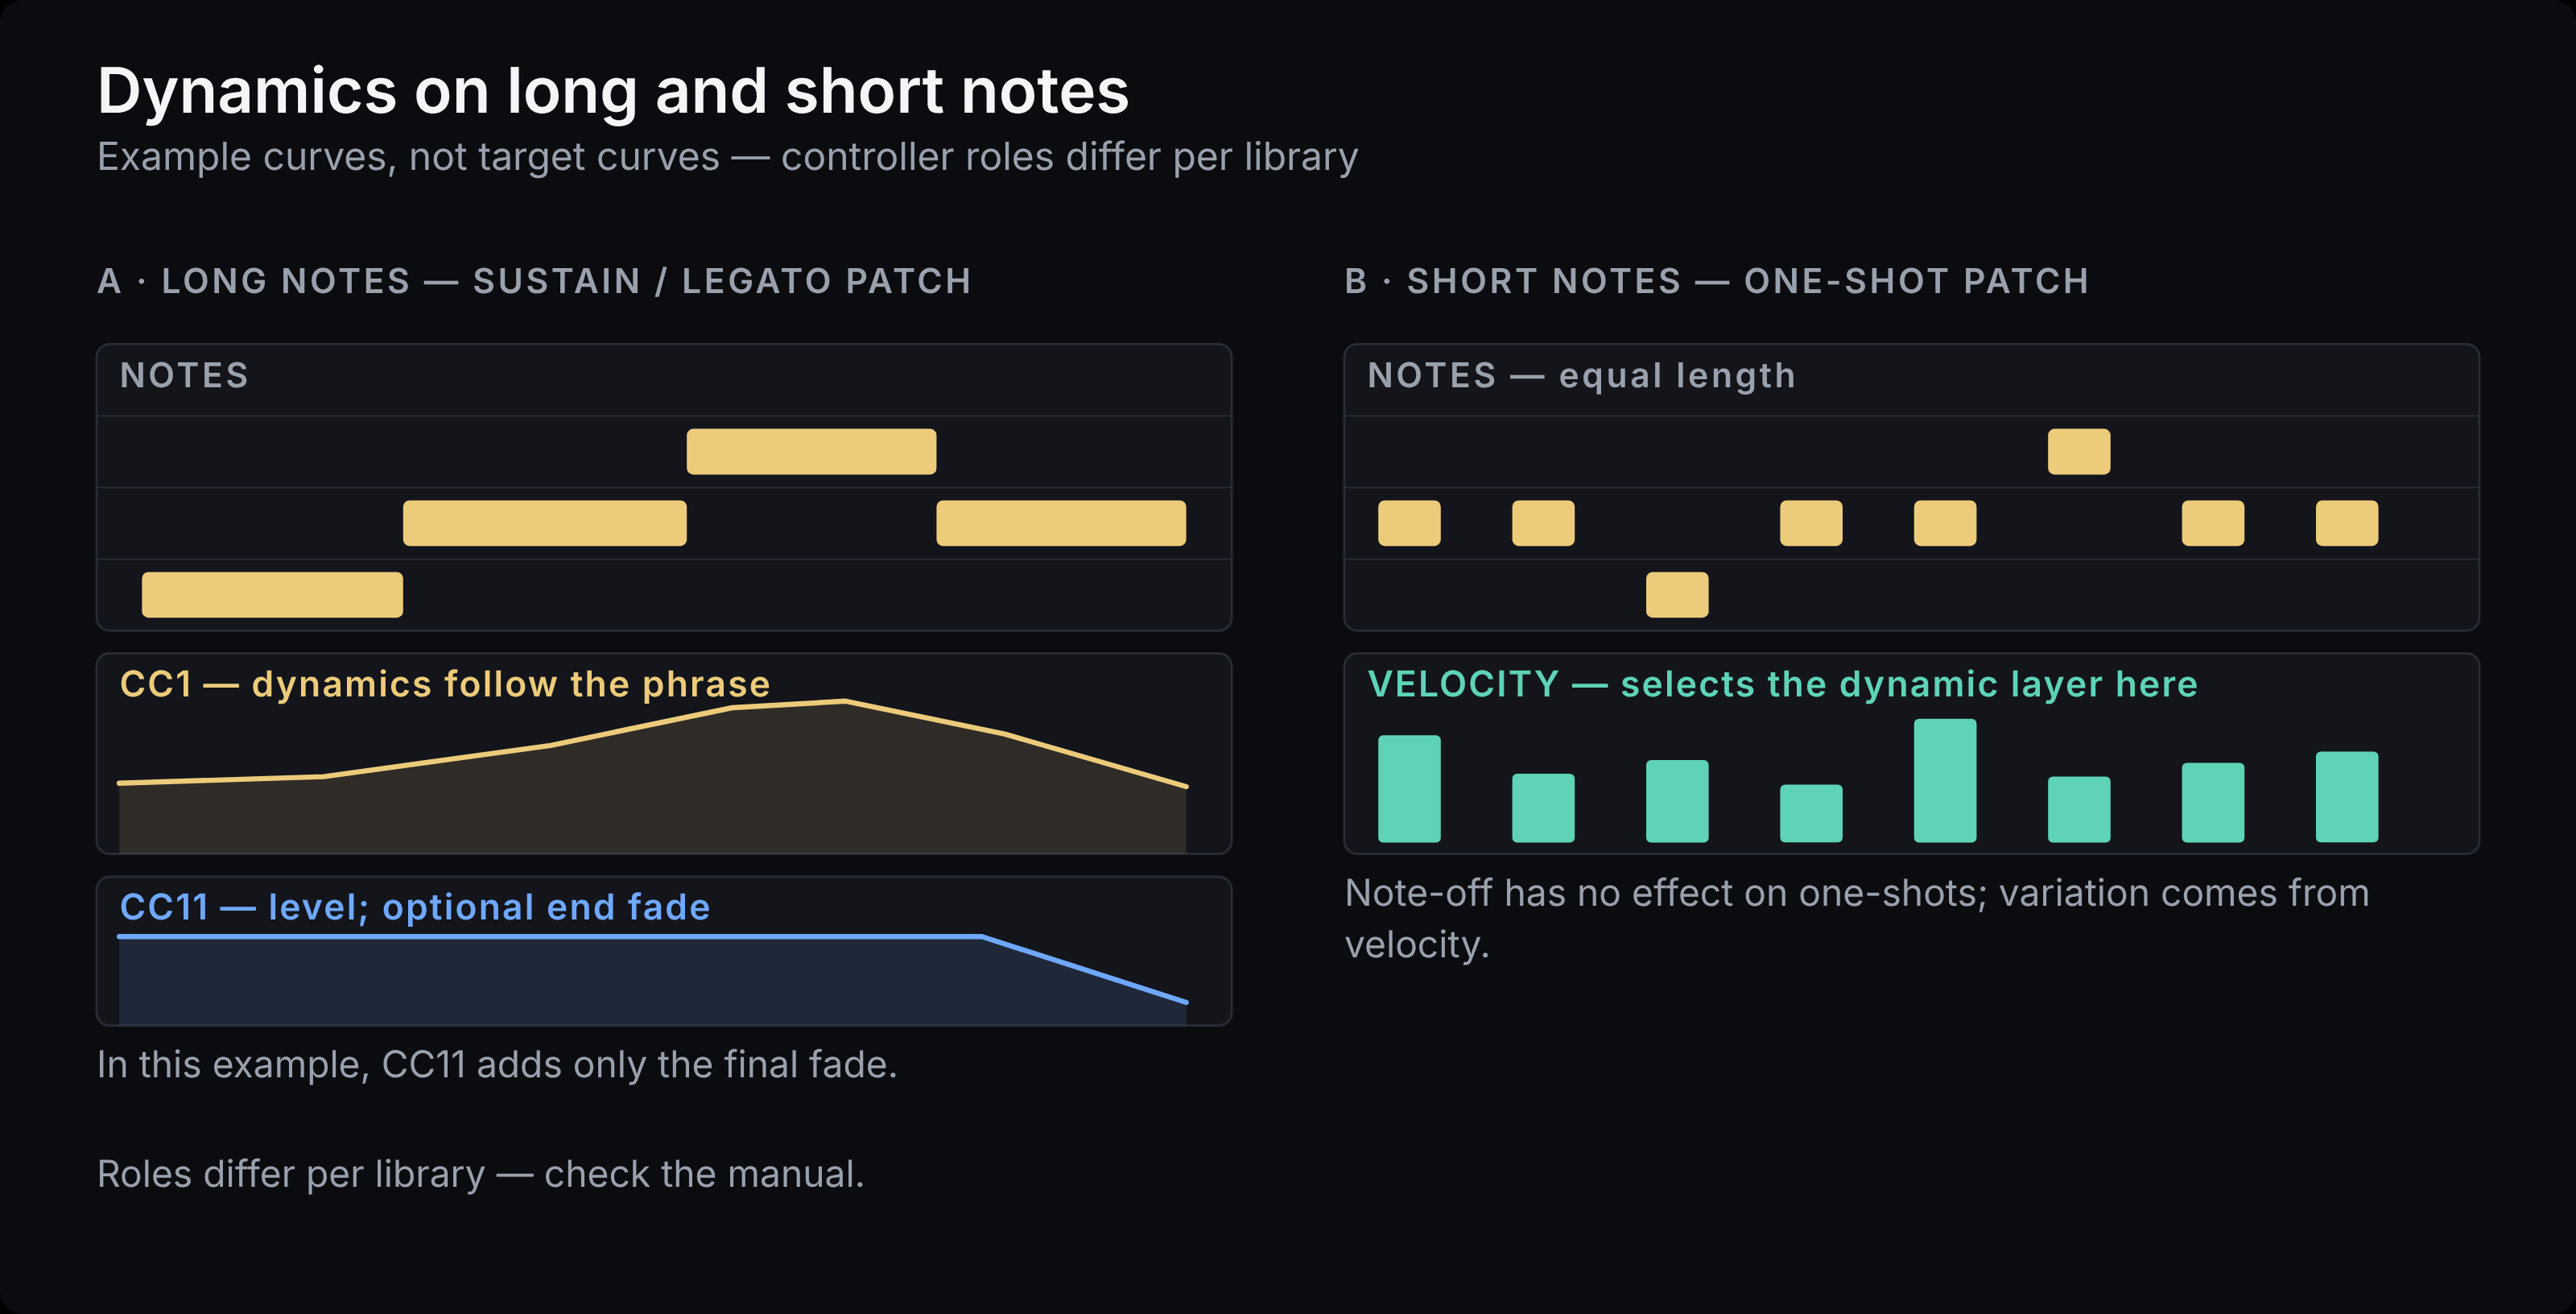
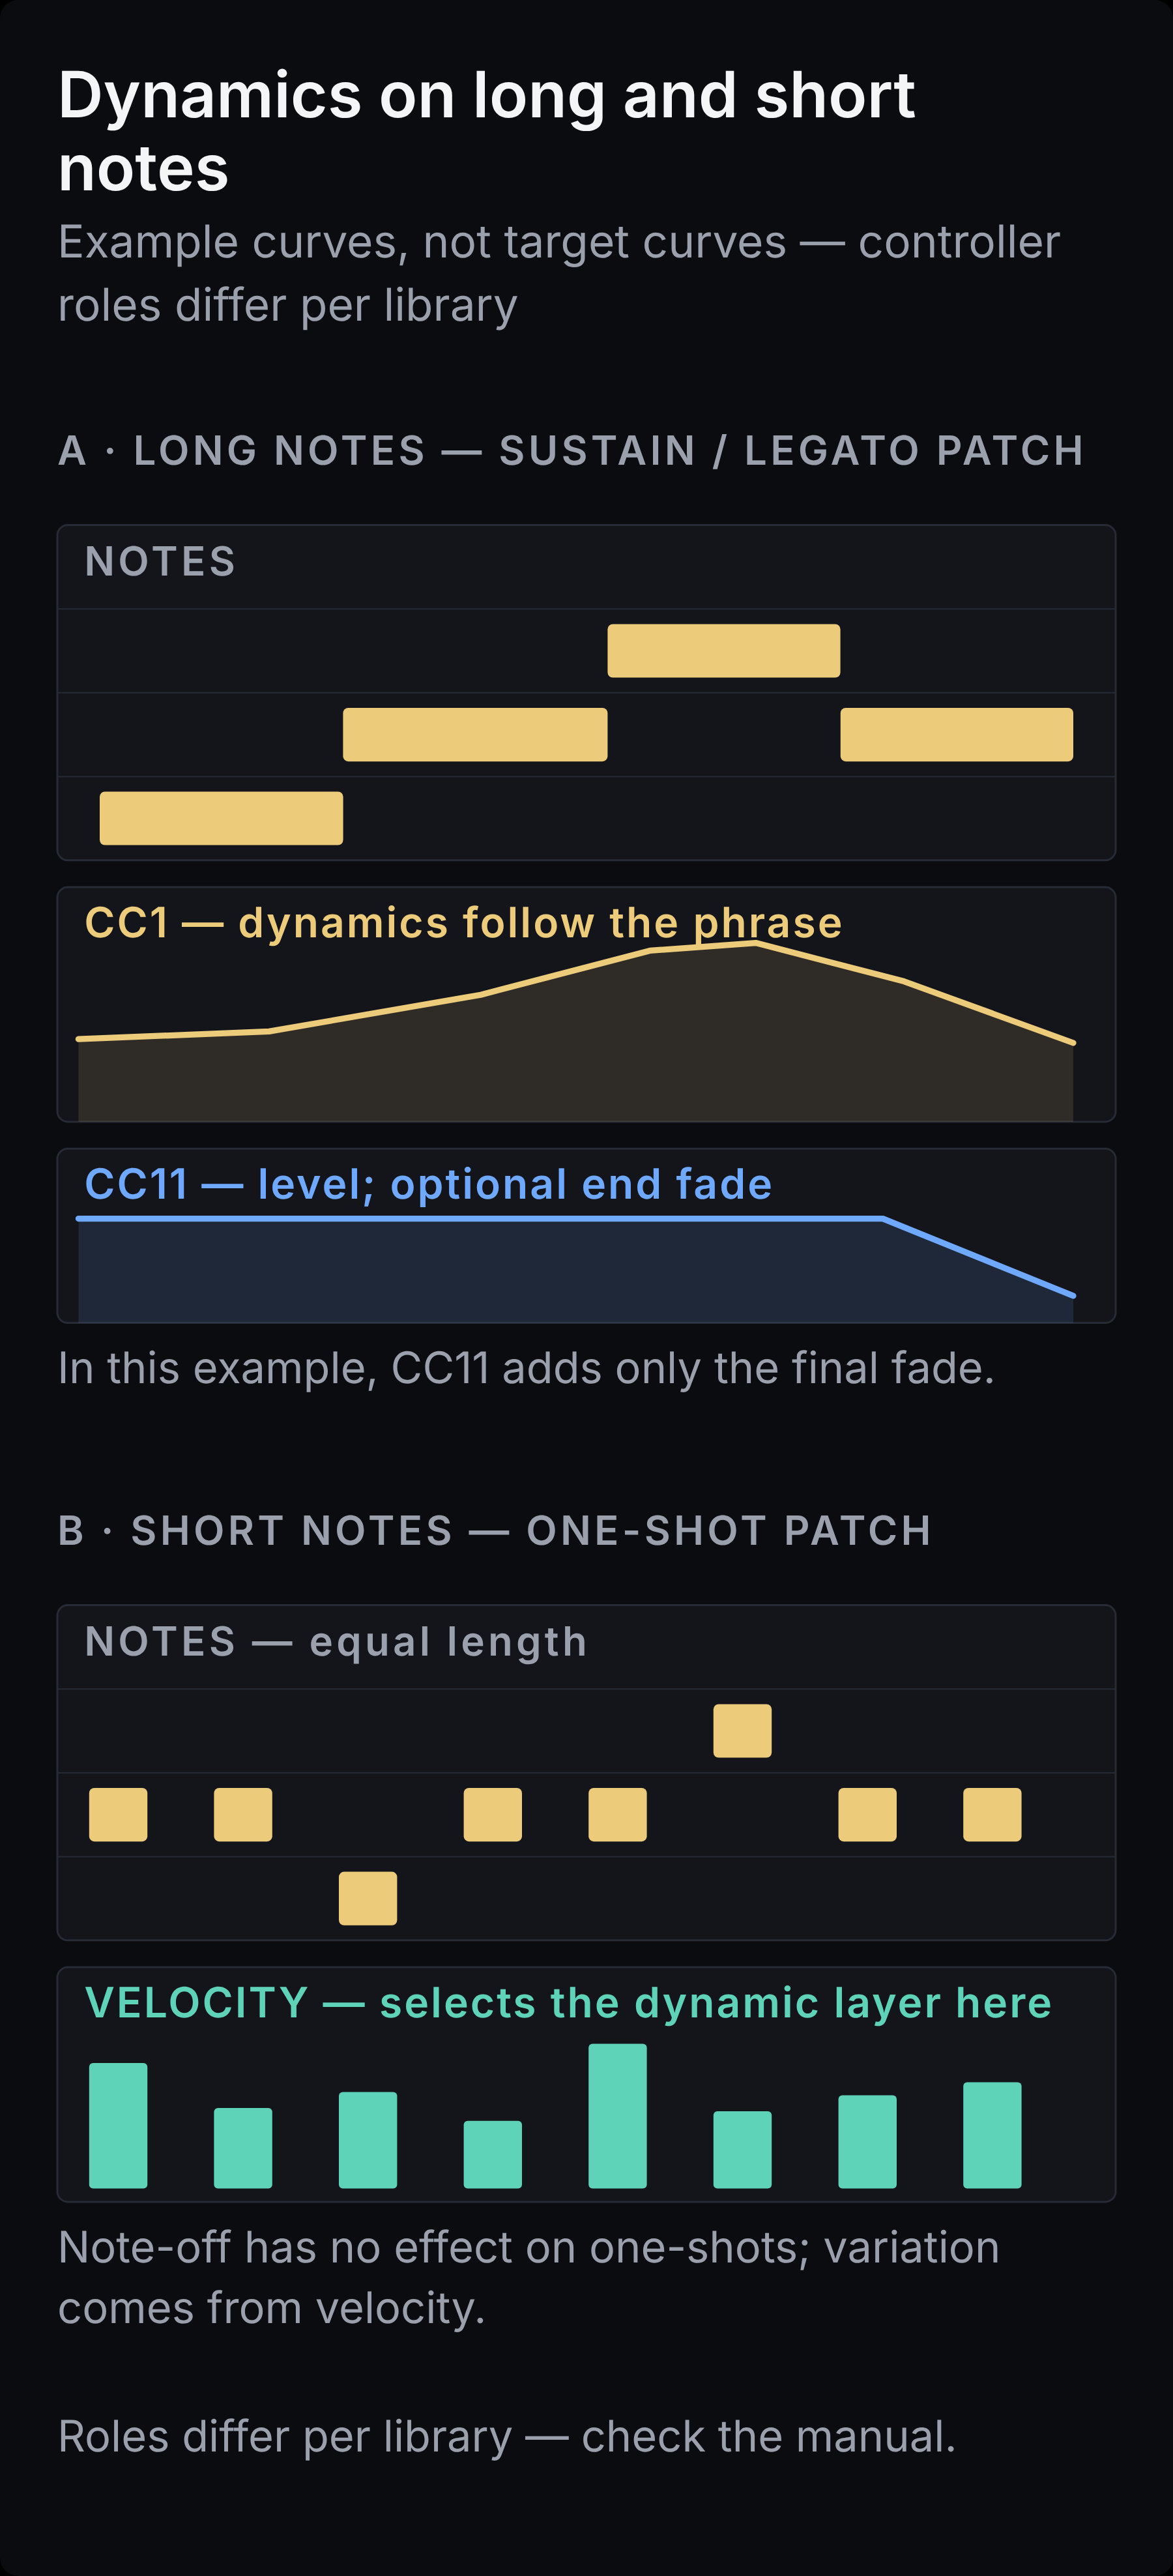
CC1 (modulation wheel) usually controls dynamics. The MIDI standard defines CC1 as the modulation wheel, not as a dynamics controller, but most orchestral libraries map their dynamic layers to it. Where they do, it changes timbre as well as loudness, because a different recording plays. Shape it around the phrase: a held chord may need only a gentle direction and an ending, a melodic line emphasis at its peak and a taper at its close. Constant wobble on every note adds movement without meaning.
CC11 (expression) is, in most libraries, additional volume shaping that does not change which dynamic layer plays. Using CC1 and CC11 together is not a mistake in itself. What rarely works is duplicating the CC1 curve into CC11 without listening to the result, which exaggerates every movement of the wheel and, in Rico's words, sounds like someone pulling down an audio fader. His personal approach: dynamics with CC1 alone, CC11 in a separate pass only where modulation is not enough (a fade to silence, a bump, a layer's level), and not at all on short notes, where he prefers the track fader. Where a passage uses CC11, ensure the intended values are written into the project, and check playback from different starting points.
Velocity is part of the note-on message, not a controller. On long-note patches it may select an attack overlay, choose a legato speed, or do nothing, depending on the library. On short-note patches it often selects the dynamic layer, which is what makes note-to-note variation possible.
CC64 (sustain pedal) is defined as sustain or damper. Some string, wind, and brass libraries repurpose it for re-bowing or re-breathing, repeating a note inside a legato line without starting a new phrase. That is a library feature, not a MIDI convention, and developers differ, as they do with vibrato. Check your library's manual.
One more habit: copied MIDI is a useful starting point, not a finished part. Check whether the receiving instrument needs different phrasing, articulation timing, velocities, or controller curves, and adapt what you hear; identical data can produce quite different performances on two instruments or sample engines.
A long note has two ends, and most of us listen to only one of them.
"I think note-off data is a little bit overlooked in many of our mock-ups and we don't pay an equal amount of attention to how a note ends and smears over the next one." — Rico Derks, The Virtual Orchestra
Note-on and note-off. The attack is mostly what was recorded. The ending involves three separate things: the MIDI note-off, the patch's release behavior (a release sample or envelope that follows note-off), and the reverb, recorded or added, that continues after both. Ending a note earlier changes when the release starts; it does not remove a hall tail. When a long release runs into the following note, the transition smears. Two options: shorten the patch's release control if it has one, or shorten the MIDI note so the release has somewhere to go.
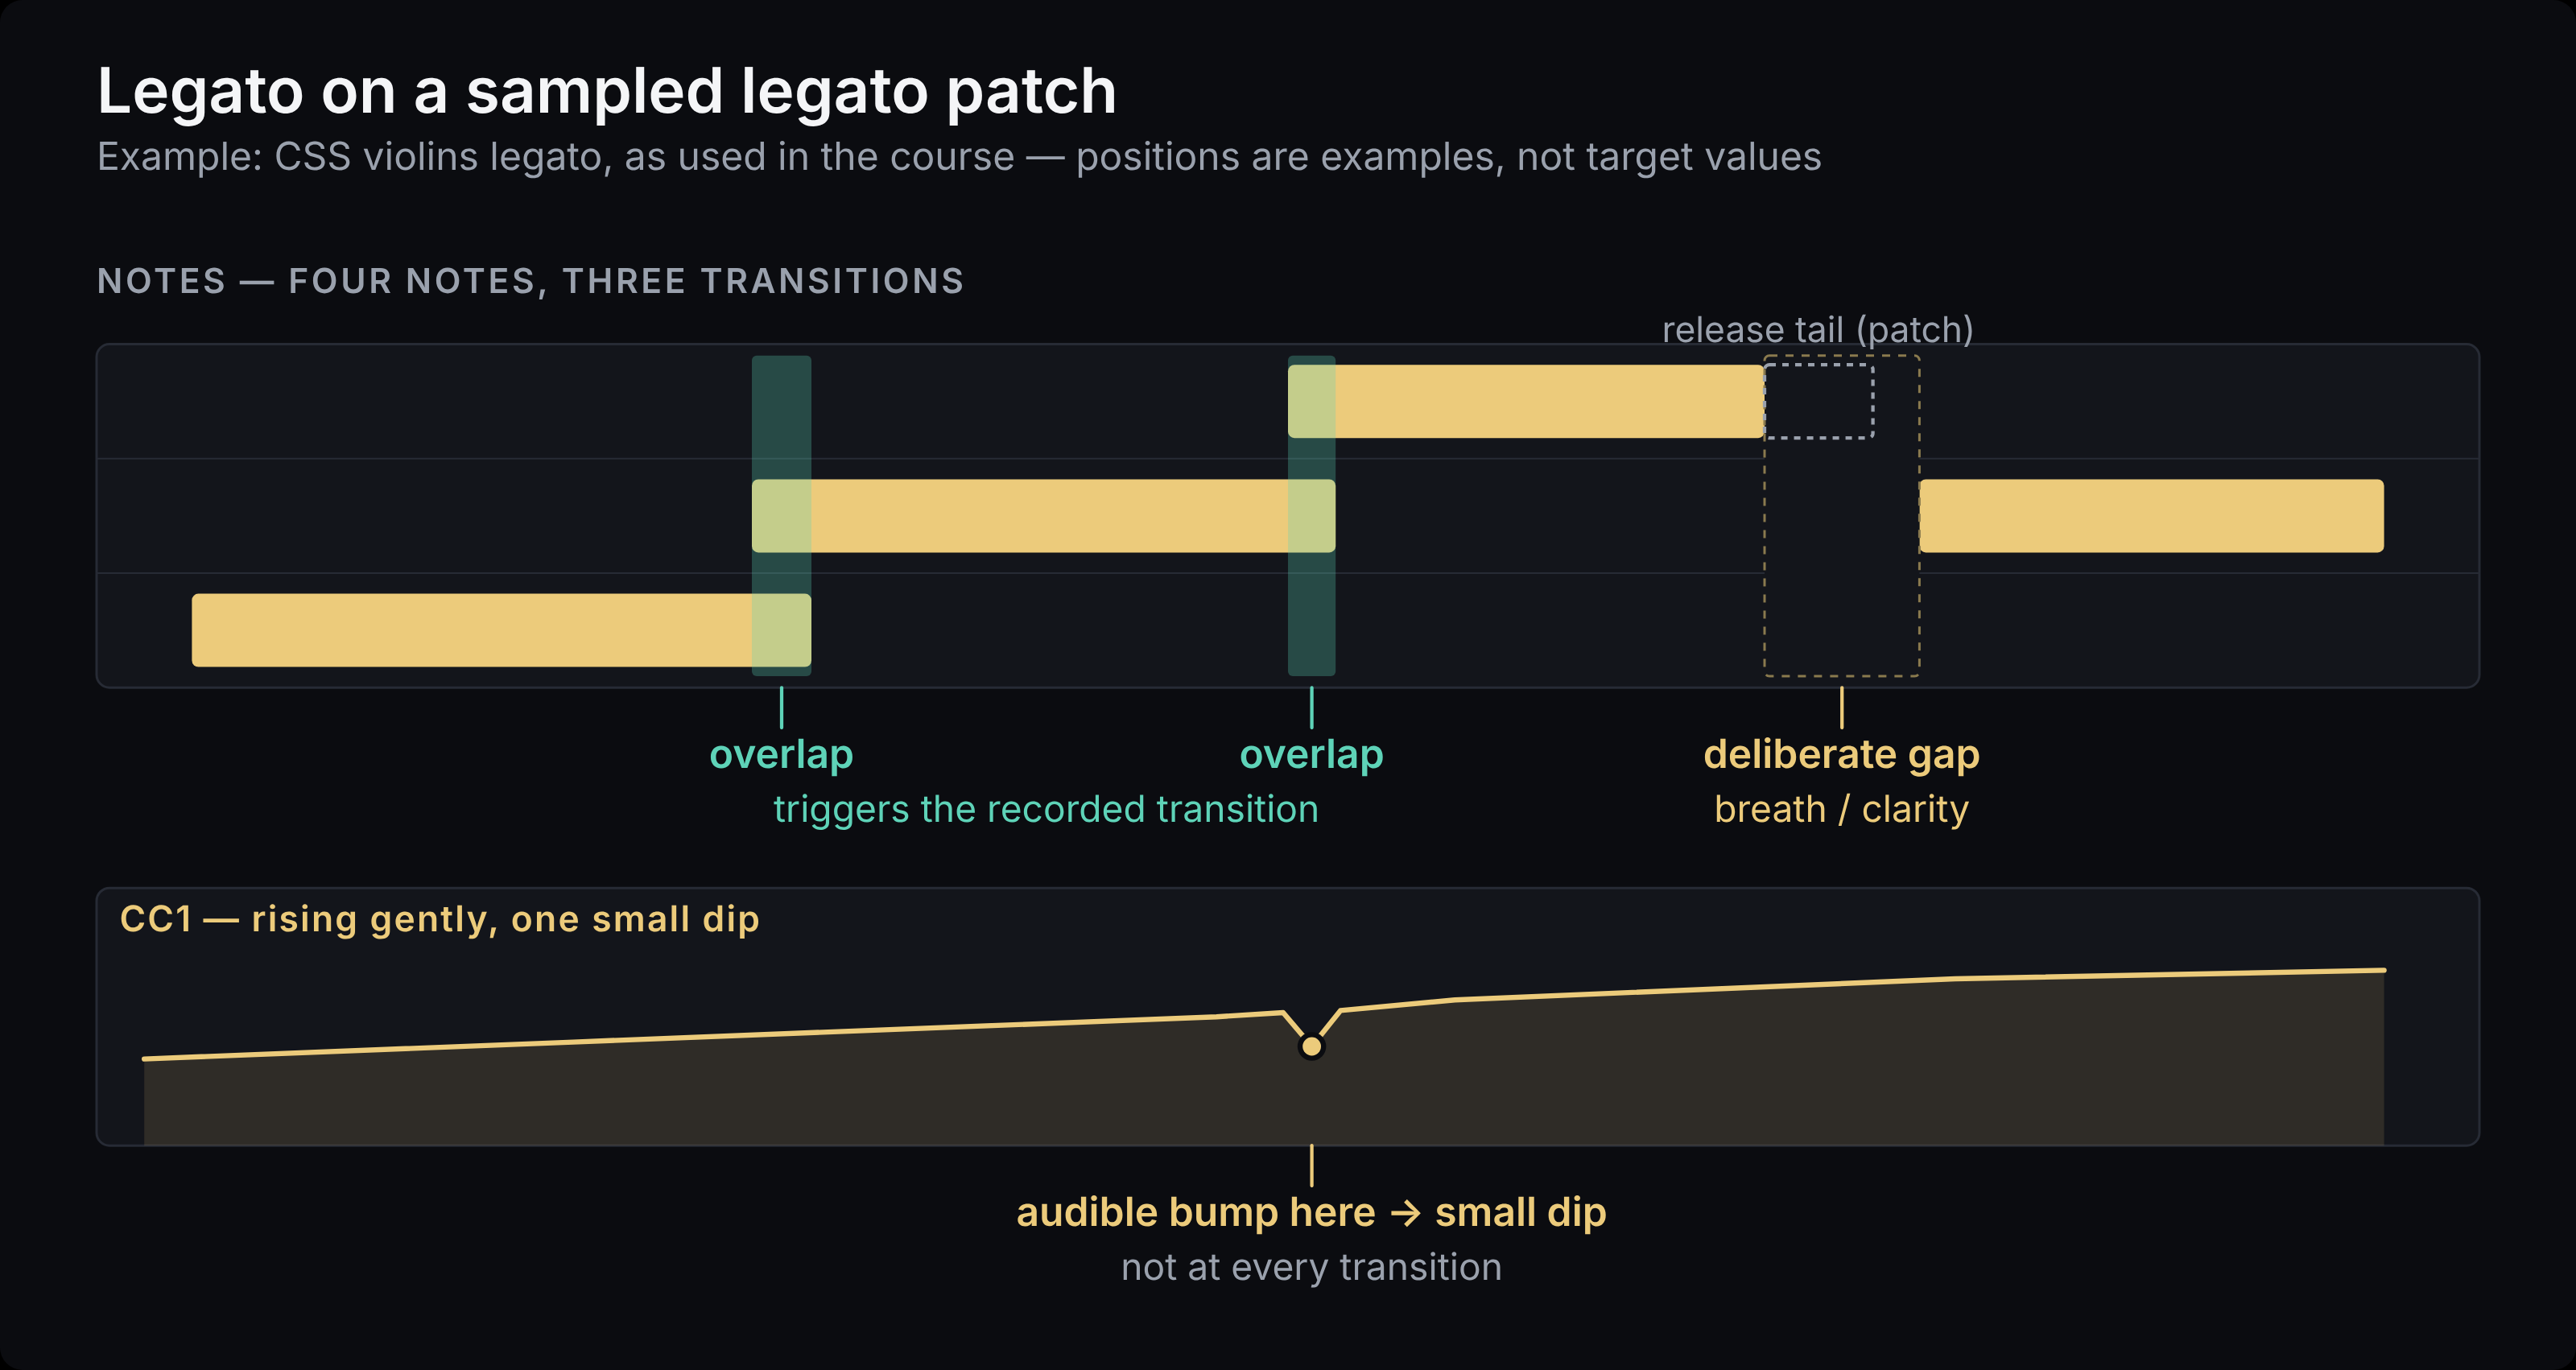
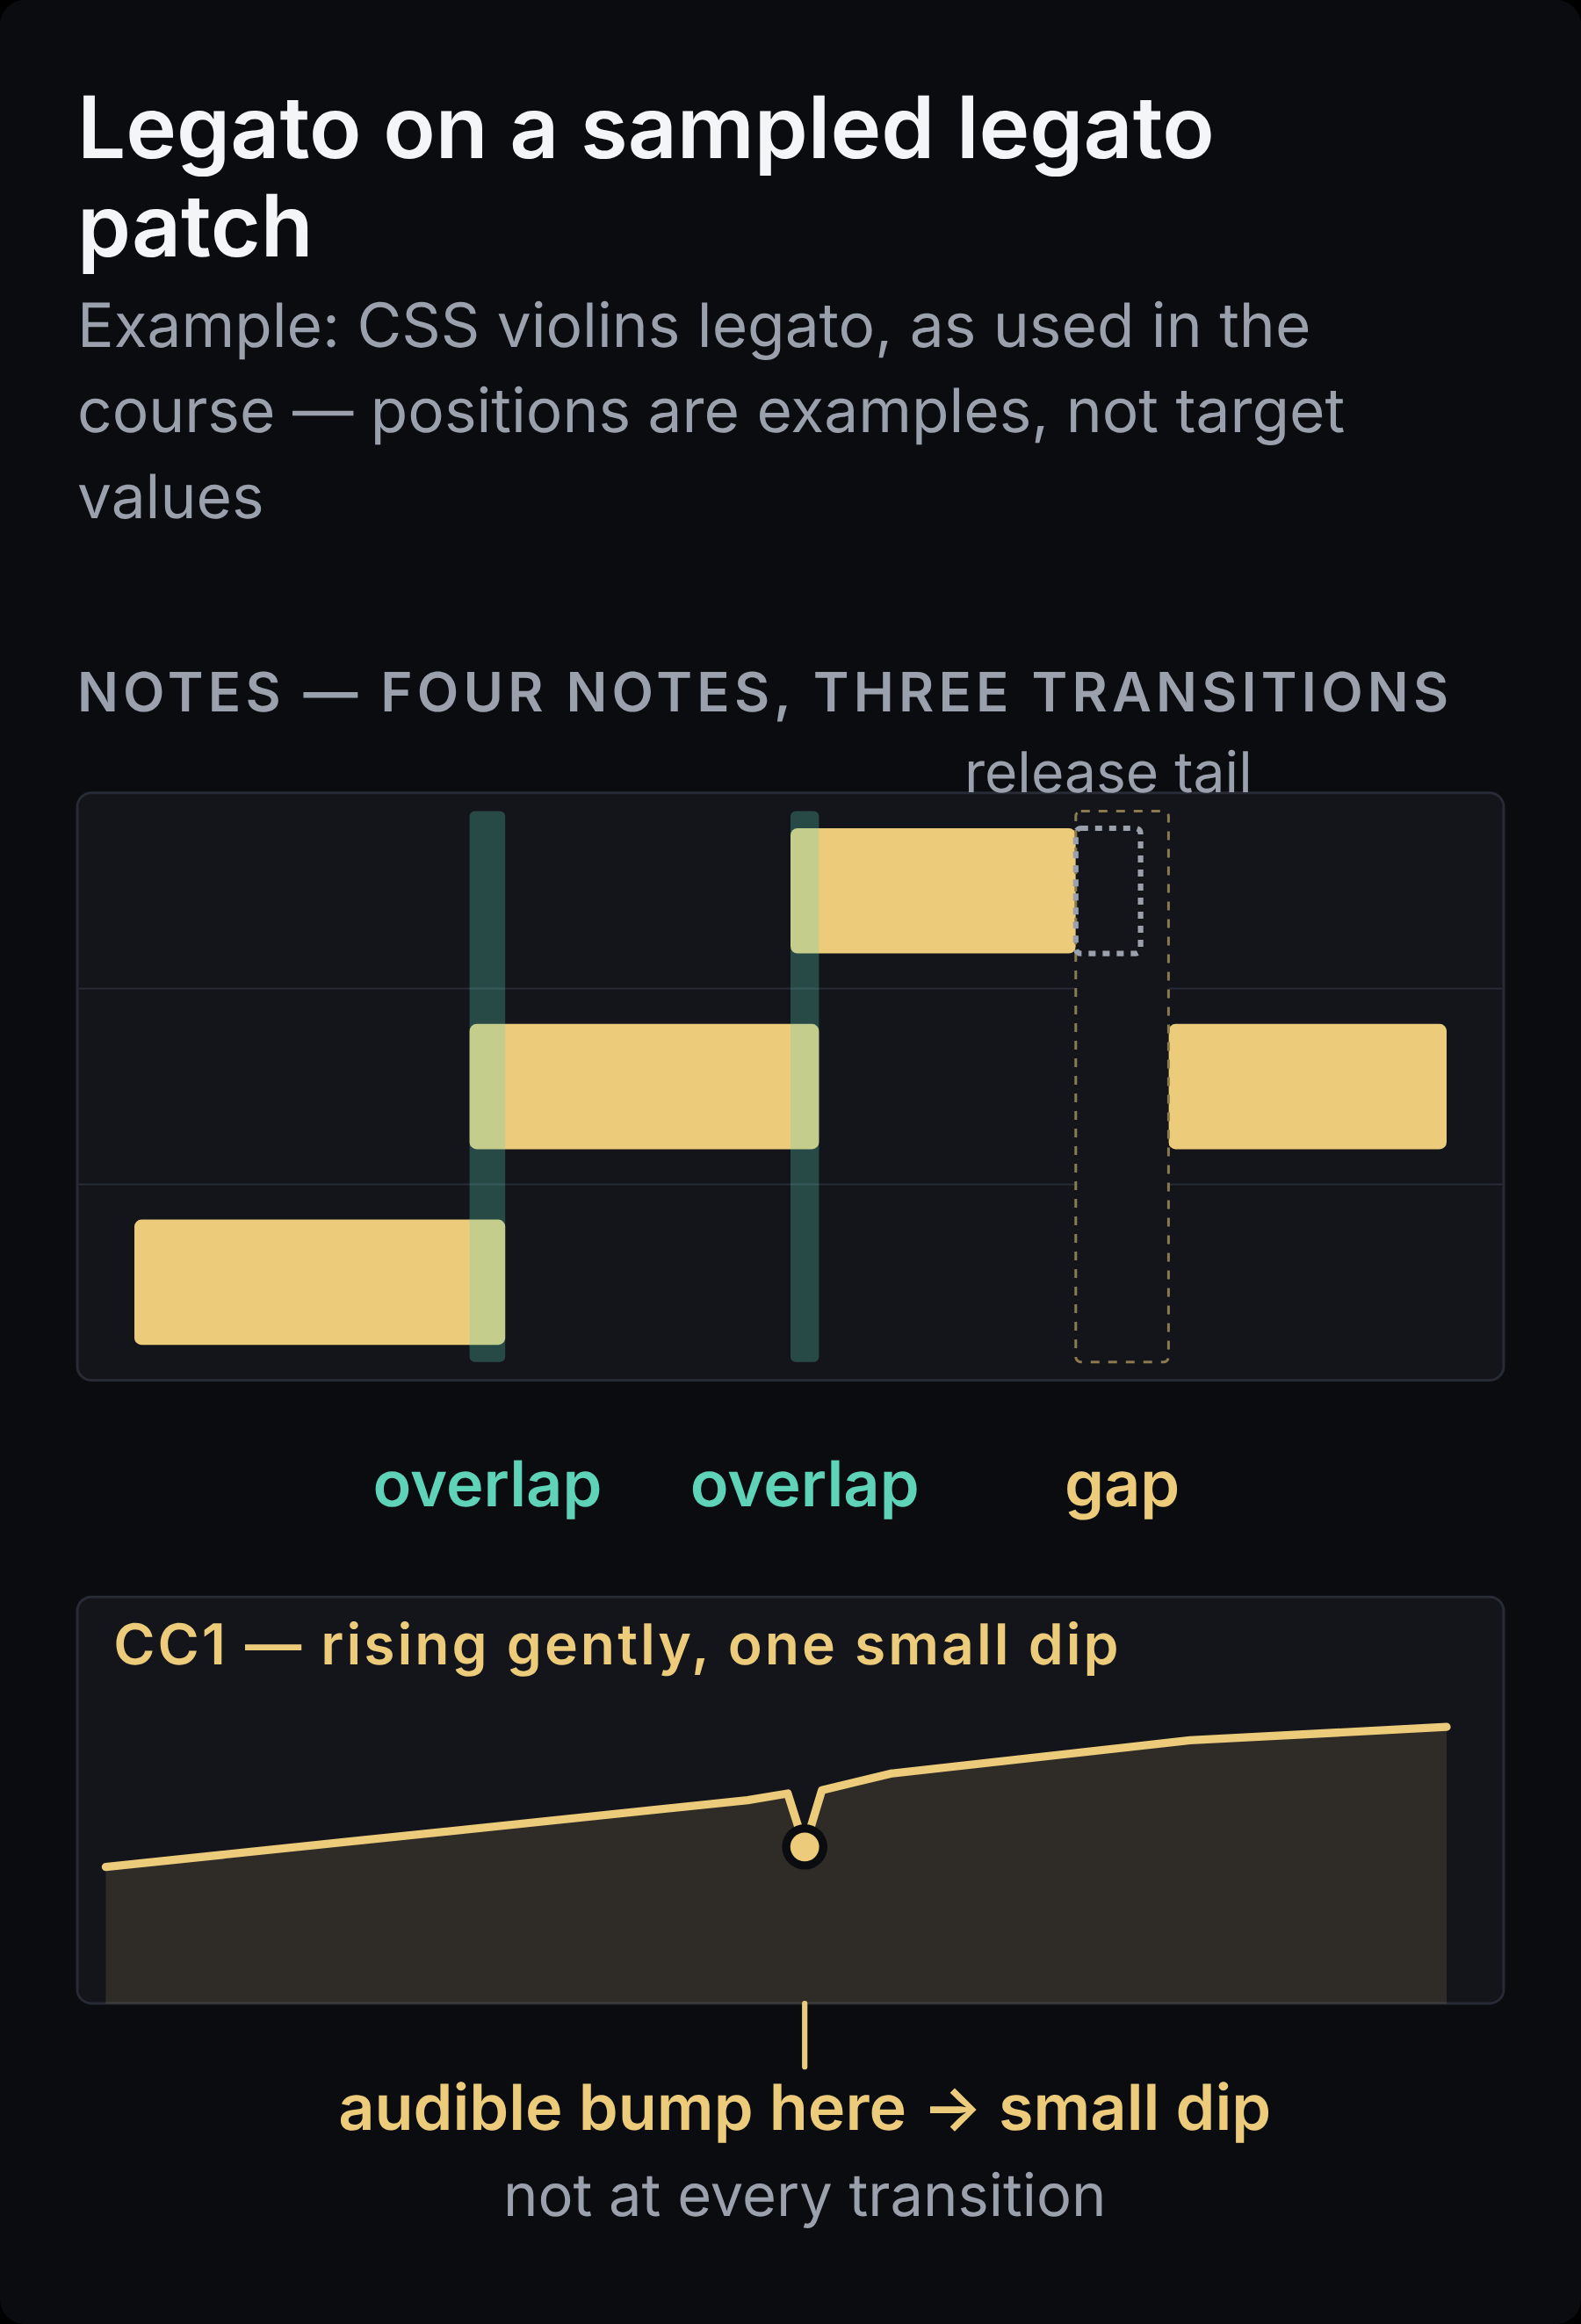
Legato overlaps. In a patch built for it, overlapping the next note with the previous one triggers the recorded transition; in a plain sustain patch the same overlap just produces two notes at once. Where a transition is wanted, overlap; where it is not, do not force one. A slight separation at the end of a short call-and-answer figure gives clarity and reads as a breath. Which transition fires depends on the library (by velocity, by playing speed, or a single bow-change type). Rico prefers the slowest legato that does not smear and no accent on the first note of a phrase unless he wants to mark it; tempo, articulation, and phrasing decide.
The volume bump and the counter-dip. Some legato transitions get slightly louder at the moment of the transition. Where you actually hear such a bump, a small dip in CC1 at that spot, returning to where the curve was heading, evens it out. Because CC1 usually changes timbre too, the dip is a listening decision, not a formula.
Crescendos and diminuendos. This is where the dynamic-layer crossfade becomes audible. If every instrument in a chord carries the same CC1 curve, the step is easier to hear, although libraries place their crossfades differently, so identical curves do not guarantee identical switch points. Options, in increasing order of effort: record the swell separately for each instrument; put one voice on a different patch or library and redo its curve; or, where the line is exposed, use a pre-recorded crescendo, which is a real performance. Diminuendos need a credible end, and that end has to fit the instrument, the dynamic, and the patch: a controlled release may sound more convincing than a long volume fade, while other passages call for a very gradual taper. Rico's brass example drops to a low dynamic and then releases, rather than fading into nothing.
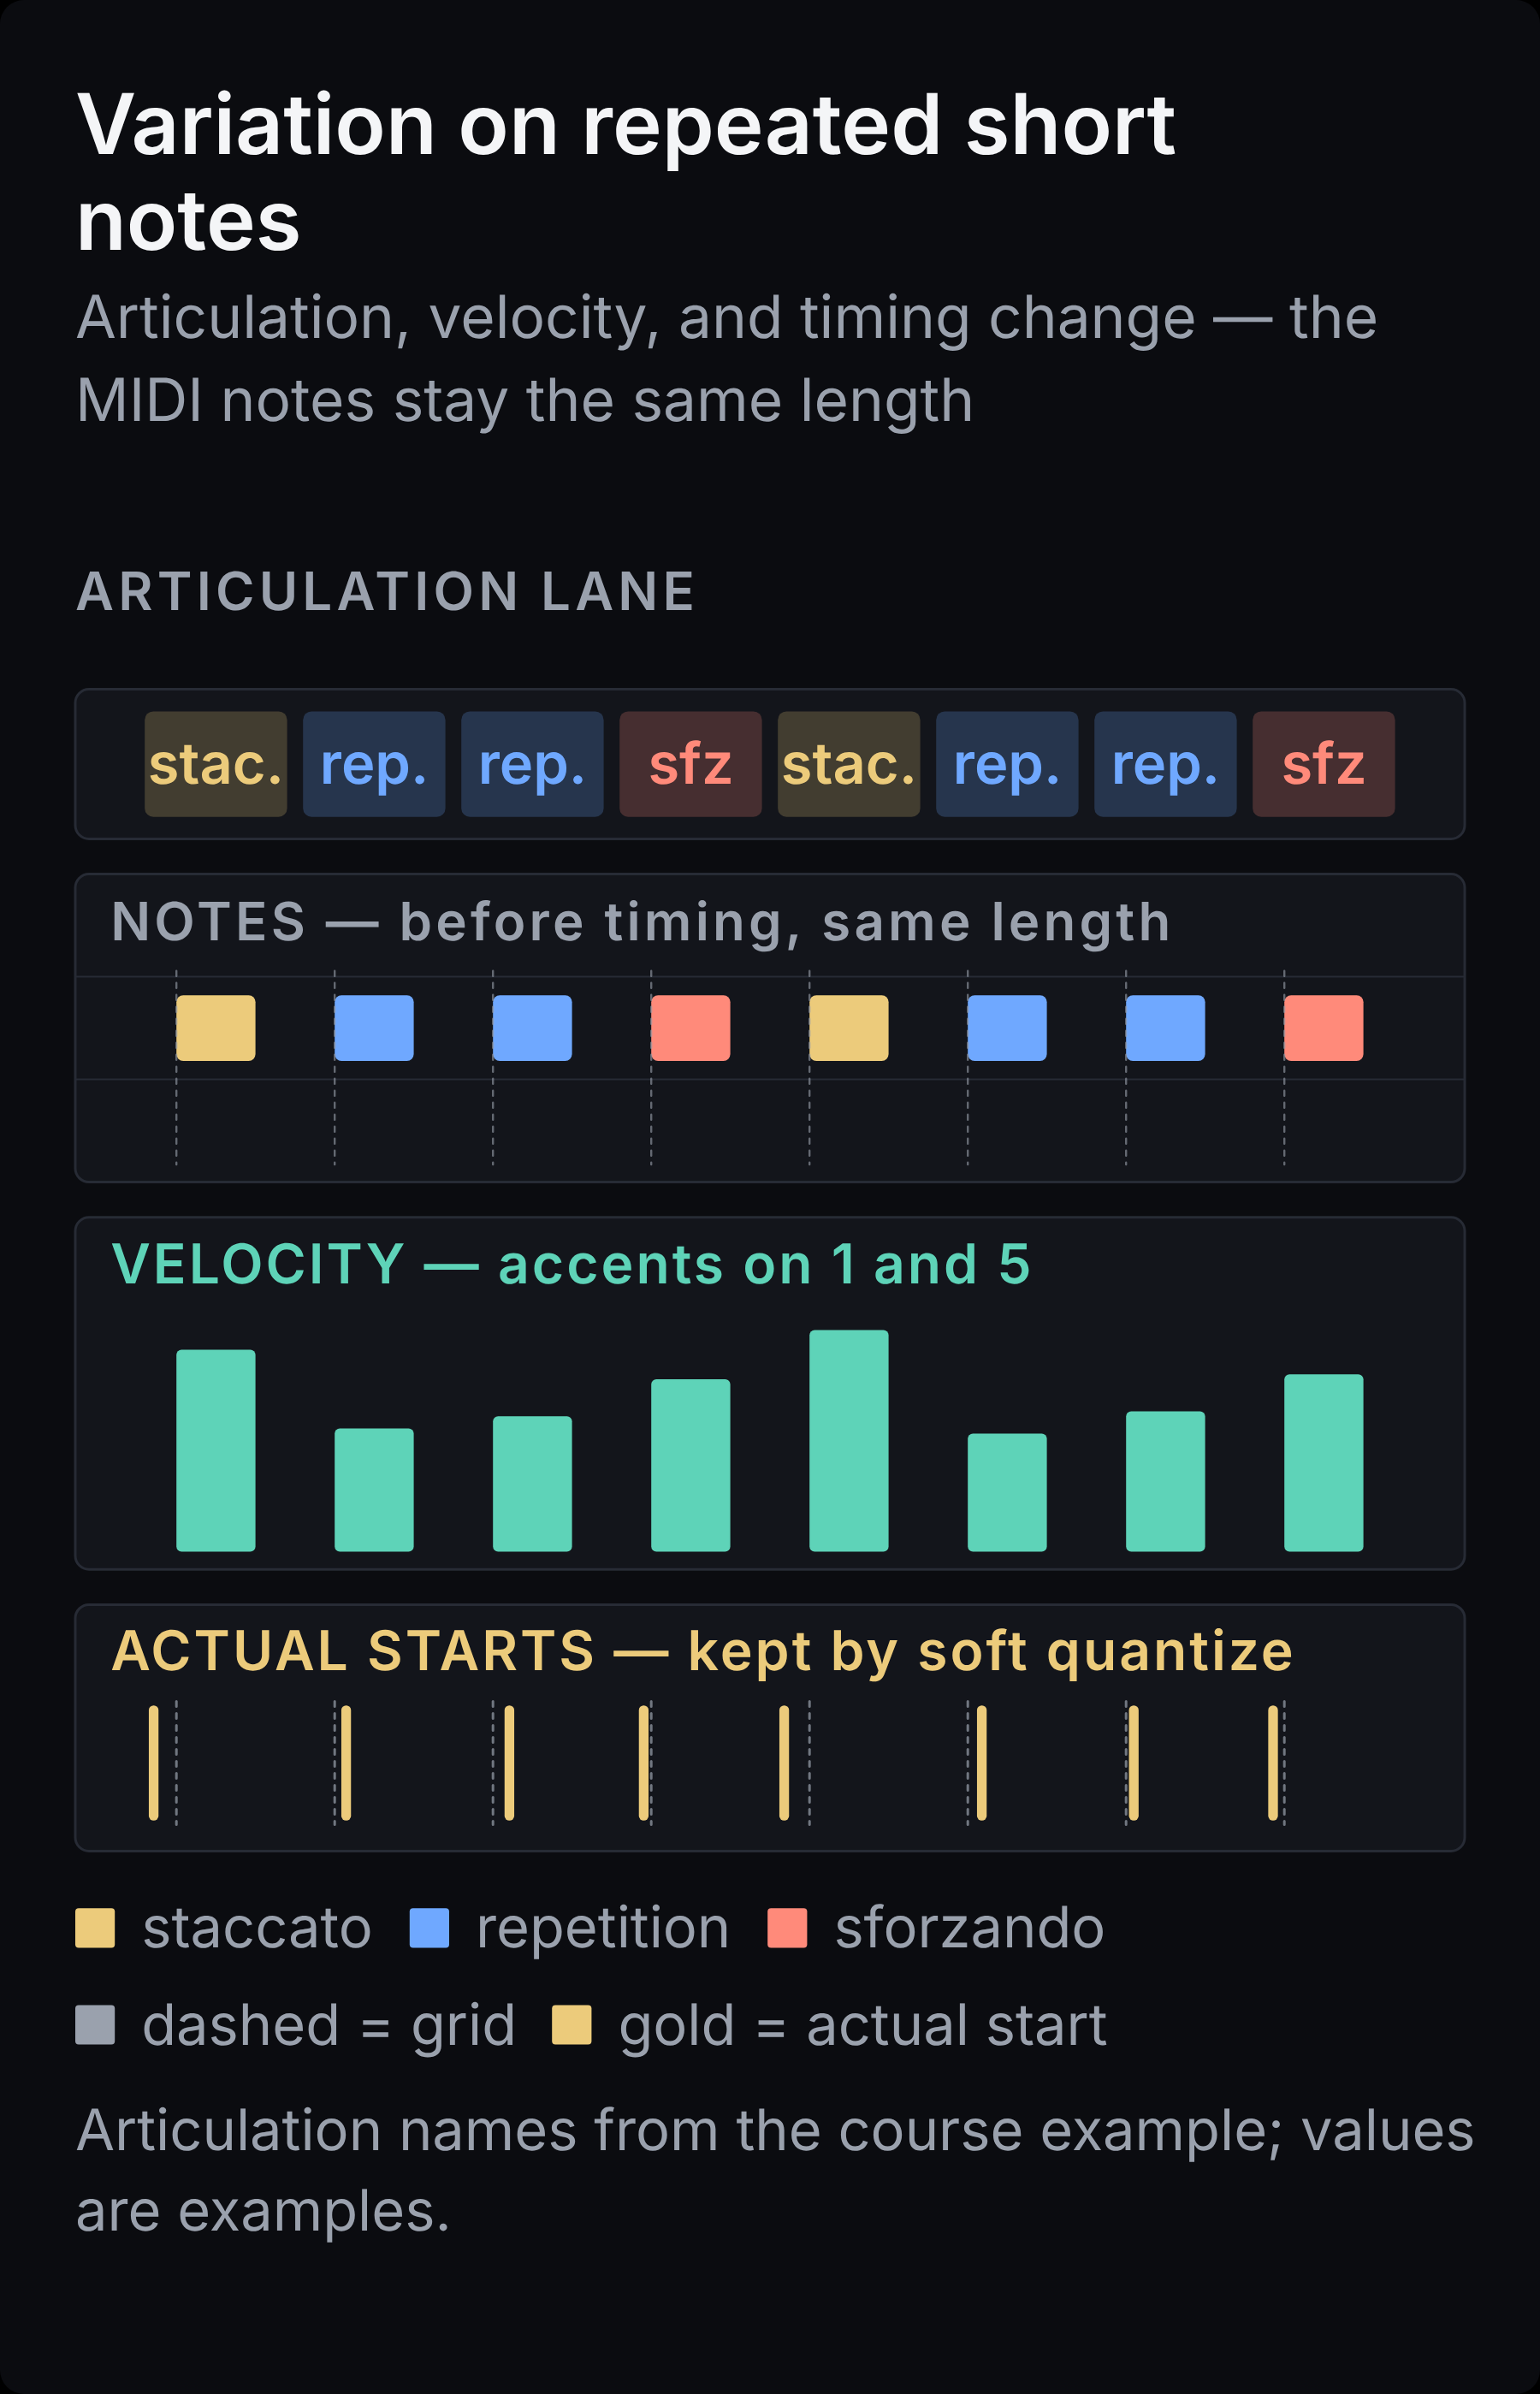
Many short patches are one-shots: the sample plays to its end regardless of when you release the key, so note-off changes nothing. The Cinematic Studio Strings (CSS) short articulations Rico uses in the course behave this way in his demonstrations; other short patches do respond to note length or release, so check the one you use. What matters is the attack, the recorded length, and, above all, variation.
"Long story short, variation. Variation is key for me. So the velocity is triggering different dynamic layers." — Rico Derks, The Virtual Orchestra
Velocity for dynamics, articulation choice for length. Rico's preferred setup puts velocity on the dynamic layers, so a passage played live gets real note-to-note differences instead of one value drawn across identical notes. In the CSS setup shown in the course, the mod wheel selects among the patch's short articulations, from spiccato through staccatissimo to staccato as the wheel goes up, and he remaps other libraries to behave the same way. That is a switch between recordings, not a continuous stretch of one sample, and a sforzando is an accented articulation rather than a length. Accented notes get a little more velocity and sometimes a longer articulation.
Use the different shorts. The library in his common-mistakes lesson has four short articulations, which he calls repetitions, staccatissimo, staccato, and sforzando. The shortest articulation can leave a melodic line too disconnected, while a longer one can blur a fast passage. Choose by the phrasing and tempo; Rico's example combines staccato, repetitions, and sforzando, and in fast woodwind or brass figures he avoids the longest short-note patch.
Why short notes arrive late, and what to do. In most libraries there is an audible distance between the MIDI trigger and the moment the ear takes as the note's start: the recorded attack takes time to develop, and in legato patches the transition sample adds its own delay. This musical onset delay is different from audio-buffer latency and from the processing delays handled by plugin delay compensation. A playback offset can align a sampled attack with the beat; it does not remove monitoring latency while you play. Notes placed exactly on the grid can therefore sound slightly late. The usual answer is a negative track delay: the DAW plays the track a little early while the MIDI stays on the grid. The amount differs per library, section, and articulation; in the recorded CSS demonstration, Rico uses roughly −60 ms for the short articulations, then adjusts by ear. One offset per track cannot fit every note when patches with different onset behavior share it, and legato patches often want their own treatment. Rico separates articulations where their timing needs differ and adjusts note placement by ear, including phrase openings.

Learn to program the whole orchestra. The Virtual Orchestra is Rico Derks's 35+ hour course on interpretation and programming: choosing libraries by sound and room, shaping the controllers, long and short notes for every section, layering, and a cohesive soundstage, all worked out on real musical examples and full cue walkthroughs. The exercises come with MIDI files, so you can program the same passages and compare your version with his. Explore the course
Realism comes from phrasing, accents, fitting articulations, timing, and how the parts interact; playing parts in, editing deliberately, and the DAW's humanize functions can all contribute.
Soft quantize, with a purpose. Hard quantizing glues every note to the grid. Precisely quantized timing can work well for certain passages, from a synth pulse or a driving ostinato to a session being prepared for notation; the Benny Oschmann walkthrough shows a well-orchestrated cue that sounds convincing on nearly hard-quantized MIDI. Where exact timing tends to hurt is exposed, expressive material: Rico's point is that ensemble precision can coexist with small differences between players, tight but not machine-tight. Soft quantize moves notes a percentage of the way toward the grid and can be applied repeatedly; Rico starts at 30 percent and adds a pass where needed. It preserves deviations that are already there; on notes that sit exactly on the grid, as with MIDI exported from notation software, it has nothing to preserve and creates no variation. Rico's tendency is to quantize slow music less, legato phrases especially, and to let faster, rhythmic material sit closer to the grid; the character of the passage decides, not the tempo alone. As a preference, he does not hard-quantize piano or percussion.
Doublings and copies. When second violins double the firsts, the two groups share the musical timing but are different players, and duplicating a part on the same patch does not necessarily create an independent second performance. Check whether the copy adds useful variation or merely reinforces the same sampled sound; replaying the part, or editing the copy's timing and velocities, gives it deviations of its own. Random offsets are not automatically better: the goal is two plausible performances of the same line, not noise. For notation-exported MIDI, Rico replays the parts on a keyboard and fixes wrong pitches afterward. In his practice, long notes can stay a little loose while short notes are kept tighter.
Note starts and endings. Small shifts in note starts help where they would happen in a performance, such as a section settling into a phrase. Note ends matter as much: higher notes can ring a little longer, phrase endings can taper as if some players stopped a moment before others, and a sharp, simultaneous cutoff at a loud dynamic can sound MIDI-ish where the music did not ask for one, and exactly right where it did. Rico leaves some imperfections in on purpose; in one walkthrough he keeps one layer of a string section slightly loose, as if those players were sight-reading. In strings he also pulls CC1 down at the end of tremolo and long notes for a controlled ending, and lowers the velocity of the last notes in a short figure so the players seem to stop the bow.
Tempo. A fixed tempo can be exactly right; much film and game music is written to a constant click. Where the music calls for it, a tempo track that slows a little into a climax and eases back gives weight to moments a fixed BPM flattens; in Rico's experience, one or two BPM already changes the impact. Judge tempo changes by musical function and, in film, by sync. You can also derive a tempo map from a freely played performance, aligning the bar-and-beat grid with its timing while retaining local expressive differences.
Breathing and fatigue. Brass and woodwind lines get small gaps where a player would breathe, and a slight separation before a downbeat can give that chord more weight. Long loud notes are kept to what a player could sustain. Two flute parts can alternate so that one breathes while the other plays.
Strings are where mockups most often sound static, and The Virtual Orchestra spends a long live session programming a strings-only piece from scratch.
One library first. Rico's first pass uses a single library, CSS in the session, with long notes and shorts on separate tracks, every part played in, and controller curves recorded in the context of the whole piece. Only when that pass is as good as the library allows does he look at what still needs help.
Divisi. Divisi means splitting a section into several parts, each played by a subset of the players; a two-part divisi, half the section on each note, is the simplest case. Three things are easy to conflate here: how many players are on a line, how loud the result is, and how intensely they play. Fewer players means a less dense sound and less total amplitude, but a half section can still play fortissimo, so a divisi line does not automatically call for a softer dynamic layer. Most full-section patches do nothing special when you play two notes: you get two full sections. In one course demonstration, a library distributes a two-note chord between A and B divisi groups, so the chord is not as loud as two full sections. Without that, Rico's approximation in his example is to lower the level and flatten the dynamic curve a little, while keeping the dynamic and color the phrase needs. Another approach is a smaller or different library as the divisi layer, because the shift in detail and focus resembles divided lines in a hall. How much, if anything, the level should drop is a balance decision for the passage, judged against brass and woodwinds, register, and dynamic; the course's practical advice is simply to listen.
Layering and section size. Layering means putting a second library's performance of the same part under or over the first: for color (a bigger, clearer, or warmer section), for close-microphone detail without riding a close mic, or for musicality (smoother transitions, or an articulation the main library lacks). This is also how section size becomes a choice: a larger recorded section can go under a thin one, a chamber or solo library on top of a melody that wants clarity. Stacking the same patch twice is not the same thing. Two identical, synchronized signals are simply louder; shifting one in time produces coloration or a flam, not a second group of players.
In the strings session Rico layers Spitfire Chamber Strings onto the CSS parts for clarity and detail. He uses only its drier microphone positions so it sits with CSS's drier tone, level-matches it first, and copies only the notes, deleting every controller and redoing the dynamics in context; in his experience a curve recorded for one library's legato behavior is at best a starting point for another's, and for this layer he prefers to replay it entirely. He aims for what he calls an 80 percent match in context, a working term rather than a measurement: the layers hide each other's imperfections, and the target is cohesion, not identity. He also layers onto only one half of a divided part, so the other half stays slightly darker. The check is an A/B at comparable loudness, layers bypassed and then in, so you judge the sound rather than the level.
Three approaches to switching articulations are common, and they combine.
A keyswitch is a key, usually at the bottom or top of the keyboard range, that tells the instrument to change articulation. It keeps the project small, but when keyswitches are recorded directly as MIDI notes they sit in the piano roll like any other note: they can be transposed by accident, they have to be removed before a part goes to notation, and the assignments vary between libraries.
Separate articulation tracks (Rico calls them split patches) put every articulation on its own track. Layering a staccato attack over a legato line becomes trivial, and each track can have its own timing offset. The cost is a long track list and, depending on how many samples and instances are actually loaded, more resources; the track count itself is not what costs.
An expression map (articulation map in some DAWs) links musical articulations to the commands a sample library needs, such as keyswitches, controller values, or MIDI channels; the DAW's articulation lane is one way of entering those articulations. Maps and keyswitches are therefore not alternatives: a map is often what unifies the keyswitches of different brands under one set of names. Because the switch is not a note in the piano roll, it survives transposition and, depending on DAW version and export route, usually stays out of a MIDI export. Cubase, as one example, distinguishes a "direction" articulation (active until the next switch) from an "attribute" articulation (attached to selected notes). For a long time one expression-map track also meant one timing offset for all its articulations; Cubase 15 added per-articulation attack compensation, so that limitation now depends on your DAW and version.
Rico's workflow in both courses is a hybrid: legato on its own track with its own offset, the remaining articulations on a keyswitch track driven by expression maps. That remains a sensible way to organize a template; it is no longer a necessity imposed by the software.
An orchestral template is a pre-configured project with your tracks loaded and, often, routing, balance, and reverb already set, so you start writing instead of rebuilding. The case for one: time, since re-creating a full orchestral setup takes, in Rico's experience, one to two hours or more; consistency, because a template becomes the sound people recognize as yours; and musical improvement, because programming decisions depend on what you hear back, so a template with a soundstage in place changes how you shape dynamics, velocities, and note ends while you write. Planning around your available resources and testing dense passages helps keep the template usable as cues grow; the plan covers the sound you want, what your machine can carry, an instrument list, an articulation strategy, and a signal flow into group busses and a pre-master. Then you write a real cue in it, because the final tweaks are only possible once there is music; a template, in Rico's phrase, is never finished.
Build the setup your mockups run on. Orchestral Template Creation is about organization: planning the sound and instrument list, routing into group busses and stems, managing articulations with expression maps that unify your libraries, and testing it all on a real cue before saving a reusable setup. More than eight hours in Cubase with EastWest Opus and the Cinematic Studio Series; the principles carry over to other DAWs, the features differ. MIDI files of Rico's Exploring the Cosmos included. Explore the course
A basic balance and soundstage help you make better programming decisions; detailed mixing builds on that foundation. The soundstage work in The Virtual Orchestra serves exactly that purpose: making different libraries feel like one orchestra in one room while you are still programming.
Balance first. Begin with level, before microphone or EQ work: within a section first, then section against section, compared at matched dynamics rather than at a maxed-out mod wheel. Lowering what is too loud is usually safer than raising what is too quiet, and you will readjust after layering, EQ, reverb, and panning anyway.
Space comes from the recording. Most of the sense of space in a sampled orchestra is already in the room microphones. Added reverb (our guide to what reverb is covers the tool) can extend or unify that space and help a drier layer sit in it, but it adds to what the recording contains rather than replacing it. Rico prefers to keep the room information of his libraries even when layering semi-dry with wet; close microphones plus artificial space is a different approach with its own trade-offs, not a wrong one.
Treat a big correction as a question. If a mix seems to need a large EQ cut on a section bus, check upstream before applying it: parts crowding one register, a library whose room does not match, a dynamic layer that does not fit the context. Sometimes the cut is still right. From here, our guide to how to mix orchestral music takes over.
Most mockup problems announce themselves as a sound. What each one often points to, and what to check first:
Our Music Composition & Orchestration Courses
Our Music Production Courses
Our Music Trailer Courses
See All CoursesWhat is an orchestral mockup? A digital performance of an orchestral score, usually built in a DAW with MIDI and sampled instruments. It can be a demo that stands in for a future live recording or the final production itself. The standard depends on which; a mockup meant as the end product needs orchestration, library choice, controller shaping, timing, and balance to work together.
How do I make MIDI strings sound realistic? Start with orchestration and phrasing. Shape CC1 around each phrase's direction and ending rather than adding constant movement, vary velocities and articulations on shorts, overlap notes only where a legato transition is wanted, and give note endings a controlled close. If one library cannot carry a passage, layer a second and adapt its controller data to that instrument in context.
What is the difference between CC1 and CC11? In most orchestral libraries CC1 crossfades between the recorded dynamic layers, changing timbre as well as loudness, although the MIDI standard defines it only as the modulation wheel. CC11 usually scales volume without changing the layer. Using both is common; duplicating the CC1 curve into CC11 without listening to the result is what exaggerates every movement. Check your library's manual.
Should I humanize with a plugin or by hand? Both can help. Humanize functions that nudge timing and velocity are useful for mouse-entered or notation-exported MIDI, and soft quantize preserves deviations from a played-in performance. The decisions that matter most are still made by ear: where a phrase breathes, which ending tapers, how a crescendo differs per instrument, and whether the tempo should move at all.
How do expression maps work with keyswitches? An expression map links musical articulations to the commands a sample library needs, such as keyswitches, controller values, or MIDI channels, so the two work together rather than compete. The switch stays out of the piano roll and survives transposition, and a map can unify different libraries' assignments. Whether one track carries per-articulation timing offsets depends on your DAW version.
Do I need an orchestral template? You can reach the same result from an empty project, but you rebuild routing, balance, and effects every time, and what you hear while programming shapes your decisions. A template saves that time and keeps your sound consistent; planning around your resources and testing dense passages keeps it usable as cues grow. A small core plus project-specific sounds is one option.
Learn with Master The Score
Courses on composition, orchestration, music production, trailer music and sound design, from composers writing for film, games and media. Students also get exclusive discounts on leading sample libraries and plugins.
Discover all courses →
Online education for media composers — orchestral writing, trailer music, mixing and more, taught by working professionals.


